
DIY Optical Liquid Level Sensor: Build & Parts Guide
A diy optical liquid level sensor can be built in two practical ways: assemble your own optical head from an IR LED, phototransistor, and prism tip, or start with a ready optical level module and focus on wiring, mounting, and calibration. The first path teaches you how photoelectric liquid detection really works. The second path is faster, cleaner, and usually more reliable for a working tank project.
This guide explains both routes, including parts, cost factors, mounting choices, calibration steps, common failure modes, and when it makes more sense to buy a finished sensor from HojellyTek instead of continuing a DIY build.
How an Optical Liquid Level Sensor Detects Wet and Dry States
An optical level sensor uses photoelectric sensing. Inside the sensor head, an infrared LED sends light into a clear prism or optical tip. A phototransistor, photodiode, or receiver detects the returned light.
When the prism tip is in air, the IR light reflects internally and returns strongly to the receiver. When liquid covers the prism, the light behavior changes because the liquid has a different refractive index than air. The receiver sees a lower or different signal, and the circuit converts that change into a wet/dry output.
For a deeper product-level explanation, see HojellyTek’s optical level sensor guide.
For DIY use, this means you are not measuring the full tank height. You are building a point-level detector: empty at this point, full at this point, overflow reached, pump protection level reached, or reservoir refill needed.
Choose Your DIY Build Path First
Path A: Use a Ready Optical Sensor Module
This is the easiest option for Arduino, ESP32, Raspberry Pi Pico, hobby automation, aquariums, water tanks, and small reservoirs. The optical head, emitter, receiver, housing, and basic circuit are already built. You only handle the low-voltage supply, signal reading, mounting, and calibration.
A ready module is best when you want a working result quickly and do not need to design the optical geometry yourself.
Path B: Build the Optical Head from Parts
This is the educational route. You use an IR LED, phototransistor or photodiode, resistors, a comparator or microcontroller input, and a prism or clear optical tip. It is useful for learning, custom shapes, or lab prototypes.
This route is harder because optical alignment, ambient light shielding, waterproofing, prism clarity, and repeatable calibration all matter. A small change in angle or surface finish can change the reading.
Parts and Cost Planning Table
Exact prices vary by supplier, quality, housing material, and quantity, so use this table as a planning guide rather than a price quotation.
| Part or Material | Purpose in the Build | DIY Cost Impact | What to Check Before Buying |
|---|---|---|---|
| IR LED | Sends infrared light into the optical tip | Low | Wavelength, viewing angle, package size, stable output |
| Phototransistor or photodiode | Receives reflected IR light | Low | Sensitivity, response speed, package alignment |
| Prism or clear optical tip | Creates the wet/dry optical change | Medium | Optical clarity, shape, liquid compatibility, polish quality |
| Resistors | Set LED current and receiver signal level | Low | Correct values for your board voltage |
| Comparator or transistor stage | Converts analog signal into stable digital output | Low to medium | Threshold adjustment, noise immunity |
| Arduino, ESP32, or MCU board | Reads the signal and controls logic | Medium | Input voltage, ADC/digital pin behavior |
| Ready optical level module | Replaces separate LED, receiver, and prism design | Medium | Supply voltage, output type, cable sealing |
| Housing or enclosure | Protects electronics from splashes | Medium | Waterproofing, cable exit, mechanical strength |
| Cable gland or sealed cable | Keeps moisture away from wiring | Medium | Seal quality, strain relief, tank environment |
| Mounting thread or bracket | Holds the tip at the correct level | Medium | Thread size, wall thickness, orientation |
| Finished industrial sensor | Production-ready alternative | Higher upfront, lower rework risk | Output, material, mounting, cable, OEM fit |
The hidden cost in DIY is usually not the LED or receiver. It is waterproofing, repeatable mounting, optical alignment, and time spent fixing false readings.
Assembly Route 1: Using a Ready Optical Module
For most builders, a ready module is the best starting point.
- Identify the low-voltage pins. Most simple modules provide power, ground, and signal. Some modules may provide digital output, analog output, or both. Do not assume wire colors; check the supplier diagram.
- Connect only to a compatible low-voltage control board. Use Arduino, ESP32, a data logger, or a low-voltage PLC input where suitable. Do not connect the sensor directly to mains power or AC pump wiring.
- Test in air first. Read the dry-state output before putting the sensor into liquid.
- Submerge only the optical tip. Record the wet-state output. If the signal is analog, note the difference between dry and wet values.
- Set your threshold. Use a clear midpoint between dry and wet readings, then add a small time delay in code to avoid false switching from waves or splashes.
For low-voltage microcontroller examples, see the Arduino guide. For general signal connection reference, use the wiring diagram.
Assembly Route 2: Building from IR LED, Phototransistor, and Prism
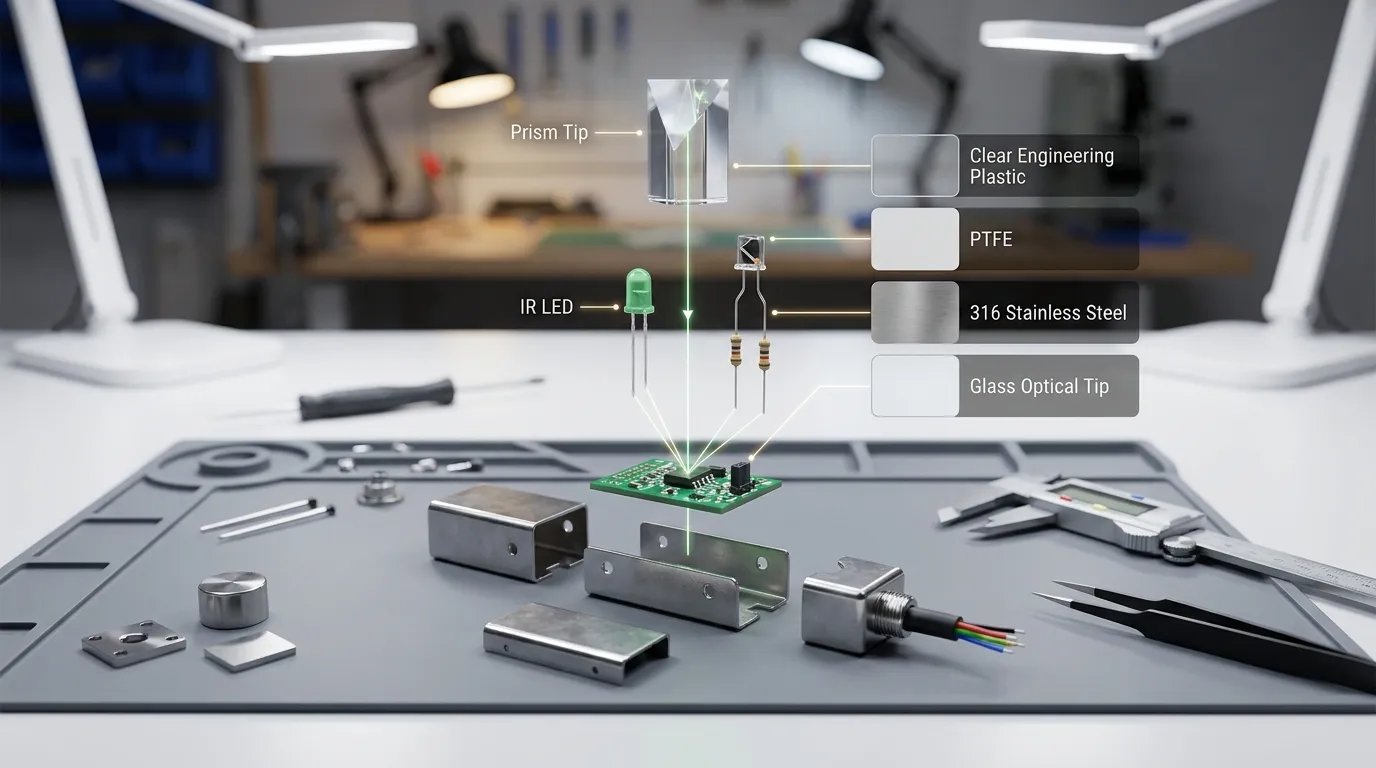
If you want to make the sensing head yourself, the optical layout is the most important part.
The IR LED should shine into the prism or clear tip at a repeatable angle. The receiver should be positioned where reflected light returns strongly in the dry state. When liquid touches the prism, the reflected light drops or shifts. Your circuit then detects that change.
A basic prototype can be arranged like this:
- IR LED aimed into the clear prism body
- Phototransistor placed to receive reflected IR
- Resistor to limit LED current
- Pull-up or pull-down resistor for receiver signal
- Microcontroller analog input or comparator input
- Shielding around the optical pair to block room light
- Sealed mechanical head so liquid reaches only the prism tip
The hardest part is making the prism. A rough plastic tip, scratched surface, cloudy epoxy, or misaligned LED can make the sensor unstable. For water, a clear plastic optical tip may work for learning. For oil, fuel, chemicals, detergents, or hot liquids, material choice becomes much more serious.
Wetted Materials: Plastic, PTFE, Stainless Steel, and Glass
The “wetted material” is the part that touches the liquid. For a DIY project, people often focus only on the circuit, but the material in contact with the liquid decides whether the sensor survives.
PSU or engineering plastic can be useful for compact water-level designs where chemical exposure is mild. It is easier to machine or mold than metal.
PTFE is chosen when stronger chemical resistance or anti-stick behavior is needed. It can be useful where residue or aggressive liquid is a concern.
316 stainless steel is common for industrial housings because it gives mechanical strength, corrosion resistance, and a professional threaded body.
Glass optical tips are often used where optical clarity, temperature resistance, or chemical stability is important. Glass can also help with repeatable sensing at the prism surface.
For DIY learning, simple plastic may be acceptable. For OEM equipment, appliances, fuel/oil projects, or exported products, confirm material compatibility before ordering any sensor.
Output Types You May See: Digital, NPN, PNP, and 4–20 mA
Small hobby modules usually provide a simple digital signal or analog voltage. Industrial sensors may use NPN, PNP, relay-style interface, or 4–20 mA output depending on the control system.
NPN output is common where the sensor sinks current to the control input.
PNP output is common where the sensor sources current to the control input.
4–20 mA output is usually used for industrial analog transmission, especially where long cable runs or noise immunity are important. For a simple point-level DIY sensor, digital output is usually enough.
Before ordering, check the input type of your controller. A sensor with the wrong output may still be a good sensor, but it will not connect cleanly to your board without interface electronics.
Mounting the Sensor Correctly
Mounting decides whether your optical sensor gives clean readings.
Side mounting is common for point-level detection. The prism tip passes through the tank wall and sits exactly at the level you want to detect. Threaded mounting is stronger than glue or tape, especially when the tank vibrates or the cable is pulled.
For small DIY containers, a bracket can hold the sensor from above, but the tip must stay fixed at the chosen height. If the sensor moves, your trigger level moves too.
Check these mounting points:
- Keep the prism tip clean and exposed to the liquid.
- Avoid placing the tip too close to reflective walls or shiny metal parts.
- Do not let cables hang in a way that pulls on the sensor.
- Seal the tank opening properly.
- Keep the electronics side away from condensation and splashes.
- Choose thread and mounting style before drilling the tank.
For production equipment, common decisions include straight vs right-angle body, threaded vs flange mounting, plastic vs stainless housing, and cable length.
Calibration: Turn Wet and Dry Readings into a Reliable Signal
Calibration is simple but should not be skipped.
First, power the sensor in air and record the dry reading. Then wet the prism completely and record the wet reading. If using analog input, choose a switching threshold between those two values. If using digital output, confirm whether the module reads HIGH when wet or HIGH when dry.
Then test real conditions:
- slow filling
- fast filling
- splashing
- bubbles
- foam
- droplets clinging to the tip
- dirty water or residue
- ambient light exposure
- vibration near the tank
Add debounce in code or logic. A short delay before confirming wet or dry prevents false alarms when liquid briefly touches the prism.
Common DIY Mistakes and How to Avoid Them
Ambient light interference: IR receivers can be affected by sunlight, strong lamps, or reflective surroundings. Shield the LED and receiver, and test near the final installation environment.
Dirty prism: Oil film, mineral scale, algae, dust, or sticky liquid can change the optical path. Clean the tip and choose a material that matches the liquid.
Wrong output assumption: Some sensors switch ON when wet; others switch ON when dry. Always test both states before connecting control logic.
Poor waterproofing: A working bench prototype may fail inside a humid tank area. Seal cable exits, protect the circuit board, and avoid exposed solder joints near liquid.
Bad prism geometry: DIY prisms need clean surfaces and repeatable angles. Rough-cut acrylic or cloudy adhesive can reduce reflection.
No mechanical strain relief: Cable movement can loosen the sensor or crack a seal.
No debounce: Waves, foam, and droplets can create short false transitions. Confirm the state for a short period before acting on it.
When Buying a Finished Sensor Is Cheaper Than DIY
DIY is cheaper when you are learning, testing one idea, or building a quick prototype from parts you already have. But a finished optical level sensor is often cheaper when you count the full project cost.
Buy a finished sensor when you need:
- repeatable wet/dry detection
- sealed cable and housing
- stable NPN, PNP, or industrial output
- compact body for limited space
- PTFE, 316 stainless, glass, or other wetted-material options
- OEM/ODM customization
- production quantity consistency
- export-ready supplier communication
- fewer field failures
HojellyTek is a Shenzhen manufacturer and exporter focused on photoelectric optical sensing, in-house R&D, and OEM/ODM liquid level sensor projects for customers in the US, EU, India, and other markets. If your DIY prototype is moving toward a real product, our finished micro optical sensor may reduce rework, sealing risk, and assembly time.
What to Confirm Before Ordering a Finished Optical Level Sensor
Before sending an RFQ, prepare these details:
- liquid type: water, oil, fuel, detergent, coolant, or chemical
- tank material and wall thickness
- mounting position and required thread style
- wet/dry logic requirement
- output type: NPN, PNP, analog, or other interface
- supply voltage required by your control board
- cable length and connector preference
- wetted material preference: plastic, PTFE, 316 stainless, glass
- whether the project needs OEM body size, private label, or custom cable
- whether the sensor is for prototype, pilot run, or mass production
For smart tank monitoring or connected appliance projects, you can also discuss integration needs such as controller boards, wireless modules, or Tuya/Smart Life-related system design where relevant.
FAQ
Can I build a diy optical liquid level sensor with an IR LED and phototransistor?
Yes. You can build a basic optical point-level detector with an IR LED, phototransistor, prism tip, resistors, and a low-voltage control board. The difficult parts are optical alignment, waterproofing, ambient light shielding, and stable calibration.
Is a ready optical level module better than building from separate parts?
For most practical projects, yes. A ready module saves time because the optical head and basic circuit are already assembled. Building from separate parts is better for learning, custom experiments, or understanding how the sensing principle works.
Can this sensor measure the full tank level?
A basic optical level sensor detects liquid at one point. It tells you whether the prism tip is wet or dry. For continuous tank level measurement, you need a different sensing approach or multiple sensing points.
Why does my optical sensor trigger incorrectly?
Common causes include sunlight, dirty prism surfaces, droplets stuck on the tip, reflective tank walls, loose wiring, poor sealing, and no debounce in the control logic. Test dry and wet readings under real mounting conditions.
Can I use this sensor to control a pump?
You can use the low-voltage sensor signal as an input to a suitable controller. Do not wire the sensor directly to mains power or an AC pump. Any pump power circuit should be designed with proper isolation and safety protection by a qualified person.
When should I contact HojellyTek instead of continuing DIY?
Contact HojellyTek when your prototype needs a sealed body, stable output, compact size, special wetted material, OEM/ODM customization, or production-ready consistency. Send your liquid type, mounting method, output requirement, and quantity plan by WhatsApp or email to request a quote.