Intégration des capteurs optiques de niveau d’eau avec Arduino
Construire un système fiable pour Surveillance du niveau d’eau Commence souvent par choisir les bons composants. Que ce soit Prévention du débordement du réservoir d’eau Dans une installation hydroponique domestique ou l’automatisation d’un appareil connecté, Améliorer votre matériel peut faire une énorme différence. Un Capteur optique de niveau d’eau Arduino Project offre une précision et une durabilité exceptionnelles. Voyons comment intégrer ces capteurs modernes de manière transparente dans votre prochaine configuration.
La Science: Comment fonctionne un capteur de niveau optique?
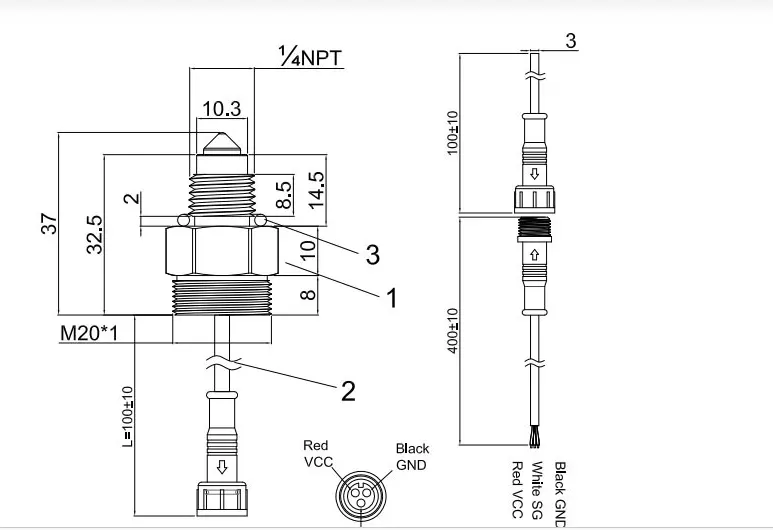
Si vous vous posez la question, Comment fonctionne le capteur de niveau optique, La réponse se trouve dans le Principe de réfraction du phototransistor. Ces capteurs abritent une LED infrarouge et un récepteur lumineux enfermés à l’intérieur d’un cône ou prisme transparent.
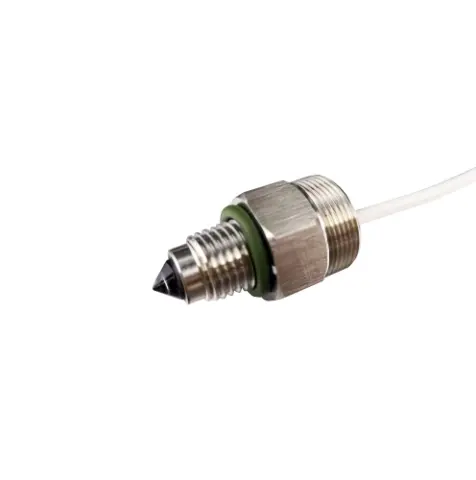
Lorsque le prisme est suspendu dans l’air, La lumière infrarouge se réfléchit à l’intérieur directement vers le récepteur. Cependant, lorsque la pointe devient submergée, Le liquide modifie l’angle de réfraction, ce qui provoque la fuite de la lumière dans le liquide. Le récepteur détecte immédiatement cette perte de lumière et modifie son signal de sortie. Quel malin, La conception à semi-conducteurs en fait une méthode très efficace Interrupteur de niveau liquide étanche.
L’avantage par rapport aux méthodes traditionnelles
Lors de la décision quel Capteur de niveau d’eau est le plus exact pour un projet, Les fabricants pèsent fréquemment un Capteur d’eau optique vs capteur ultrasonique. Tandis que les modules ultrasoniques excellent dans Détection des niveaux liquides sans contact sur de plus grandes distances, Une sonde optique fournit une détection exacte au niveau ponctuel. Cela se traduit directement par Détection de liquide de haute précision sans les angles morts courants dans les alternatives ultrasoniques.
En outre, Capteurs optiques D’immenses offres Avantages par rapport aux interrupteurs à flotteur mécaniques, qui se bloquent souvent à cause de l’accumulation de minéraux, Algues, ou des débris flottants. Parce qu’ils n’ont pas de pièces mobiles, Les sondes optiques délivrent Surveillance des niveaux résistants à la corrosion. Cela en fait le choix ultime pour les applications critiques, comme la garantie Automatisation fiable de la pompe de cale dans les milieux marins.
Configuration matérielle: Câblage et emplacement
Débuter avec un standard Capteur d’eau Arduino est rafraîchissante et simple. Quand Sonde de niveau infrarouge câblée Modules, En général, on connecte la broche VCC à 5V, GND à la terre, et la broche de signal vers une entrée numérique ou analogique de votre microcontrôleur.
Conseils de pro pour le placement:
- Protégez le capteur: Parce que ces modules dépendent de la lumière infrarouge, La lumière directe du soleil peut parfois déclencher de fausses lectures. Implémentation simple Solutions d’interférence de lumière ambiante—comme loger la sonde captrice dans un obscur, tuyau PVC opaque — assure un fonctionnement parfait.
- Montez solidement: Assurez-vous que le capteur est monté horizontalement ou pointé vers le bas afin d’empêcher les gouttelettes d’eau de s’accrocher au prisme lorsque le niveau d’eau baisse.
Logiciels: Codage et calibration
Écrire le logiciel pour votre Capteur optique de niveau d’eau Arduino La configuration ne nécessite que quelques lignes de logique. Pour les modèles numériques, une lecture numérique de base() La fonction vous indiquera si la sonde est humide ou sèche. Cependant, Si vous utilisez une variante analogique, Tu vas y passer quelques minutes Calibration des capteurs liquides analogiques en lisant les légères chutes de tension pour déterminer le point de déclenchement exact.
Assurer la stabilité du système, Il est crucial d’écrire un robuste Code de seuil de détection de niveau liquide avec logique de rebond. Au lieu de déclencher immédiatement une pompe sur une seule lecture, programmez votre Arduino pour vérifier que le capteur est submergé en continu pendant quelques secondes. Cela empêche la rapidité, Activation dommageable causée par des ondulations de surface ou des éclaboussures.
Intégrant Capteurs optiques Avec votre microcontrôleur, la fiabilité de vos projets de gestion des fluides augmente. En comprenant le principe de réfraction et en appliquant des seuils de base du logiciel, Vous pouvez construire un robuste, Système à faible entretien parfaitement adapté à vos besoins d’automatisation.