How to Safely Remove Water Sensors for Maintenance and Upgrades
You need to handle water sensors removed with care to keep your system working well. Use the right steps and tools to avoid damaging the sensors or your rv holding tank. Always focus on safety when you work with these parts. Some people remove sensors for maintenance, cleaning, or upgrades. You protect your equipment and ensure accurate readings when you follow safe procedures.
Preparation and Safety for Water Sensors Removed

Gather Tools for Remove Tank Sensors
Before you start, gather all the tools you need. This step helps you work faster and safer. You should have gloves to protect your hands from sharp edges or chemicals. Use an adjustable wrench, such as a ⅜ inch open wrench or a ⅜ inch socket wrench, to loosen bolts. Channel lock pliers help you grip and turn stubborn parts. Electrical tape, in any color except black, can secure wires during removal. These tools make it easier to remove holding tank sensors and prepare for replacement.
Tip: Keep your tools organized in a small tray or toolbox. This habit helps prevent losing parts and supports habits that keep sensors accurate.
Turn Off Power and Water Supply
You must turn off the power and water supply before you touch any holding tank sensors. This step keeps you safe from electric shock and water leaks. Find the main power switch for your RV or system and switch it off. Shut off the water supply valve to stop water from entering the tank. Always double-check that both are off before you begin. These habits that keep sensors accurate also protect your equipment from damage.
- Regularly check for water using automatic tank gauging systems.
- Inspect fill and vapor caps for damage.
- Properly dispose of any water found in containment buckets.
Turning off these systems helps you avoid accidents and makes it easier to replace the sensors or perform maintenance.
Review Manufacturer Instructions for Holding Tank Sensors
Read the manufacturer’s instructions for your holding tank sensors. Each model may have different steps for removal or replacement. The manual will show you the safest way to remove the sensors and avoid breaking them. Some instructions include diagrams or safety warnings. Following these directions helps you choose the right replacement and keeps your system working well.
Note: If you cannot find the manual, check the manufacturer’s website or contact their support team for guidance.
You should also hire a qualified professional if you feel unsure about any step. Professionals can clean tanks, remove water, and replace the sensors safely. This approach ensures your replacement goes smoothly and your holding tank sensors stay reliable.
Wear Protective Gear
You need to protect yourself when you remove water sensors. Water tanks and sensors can have sharp edges, chemicals, or bacteria. Wearing the right gear keeps you safe and helps you work with confidence.
Here are some important items you should wear:
- Gloves: Use chemical-resistant gloves. These protect your hands from sharp parts and harmful substances.
- Safety Glasses: Wear safety glasses or goggles. These shield your eyes from splashes or flying debris.
- Long Sleeves and Pants: Cover your arms and legs. This clothing helps prevent cuts and skin contact with chemicals.
- Face Mask: Use a mask if you work in a small space or near strong odors. Masks help you avoid breathing in fumes or dust.
- Closed-Toe Shoes: Wear sturdy shoes. These protect your feet from falling tools or parts.
Tip: Always check your gear for damage before you start. Replace torn gloves or broken glasses right away.
You should also keep a first aid kit nearby. Accidents can happen, even if you take care. Quick access to bandages or eye wash can make a big difference.
If you work with cleaning chemicals, read the labels. Some products need extra protection, like a respirator or apron. Follow all safety warnings on the packaging.
You protect yourself and others when you use the right gear. You also set a good example for anyone helping you. Safety gear helps you focus on the job and finish it without injury. Always make safety your first step before you remove any water sensor.
Step-by-Step Guide to Remove Tank Sensors
Locate Holding Tank Sensors
You need to find the exact spot where your sensors sit before you start any work. Most holding tank sensors are easy to spot if you know where to look. You can find them on many types of tanks in both homes and businesses. Here are some common places where you might find them:
- Water tanks
- Rainwater tanks
- Fuel oil tanks
- Septic pump tanks
- Chemical storage tanks
- Day tanks
- Batch tanks
- Waste sumps
- Bulk storage tanks
You should check the outside of the tank for small panels or covers. Sometimes, you will see wires running to a small device attached to the tank wall. This device is usually the sensor. If you have trouble finding it, look for labels or ask the manufacturer for help. Make sure you do not confuse the sensor with other equipment, like valves or pipes. Finding the right sensor helps you avoid mistakes and prevents leaks during removal.
Tip: Take a photo of the sensor and its location before you start. This step helps you remember how to put everything back together later.
Disconnect Electrical Connections
Once you locate the sensors, you need to disconnect the electrical connections. This step keeps you safe and protects the system from damage. Always check that the power is off before you touch any wires. You can use a voltage tester to make sure there is no electricity running to the sensor.
Start by looking for the wires that connect the sensor to the control panel or display. Most sensors use simple wire connectors or clips. Gently pull apart the connectors. Do not yank or twist the wires, as this can cause damage. If you see any tape or wire nuts, remove them carefully and set them aside for reuse.
If you notice any signs of water or moisture near the wires, dry the area with a clean cloth. Water near electrical parts can cause leaks and short circuits. You should also check for corrosion or rust on the connectors. Clean any dirty spots with a small brush before you continue.
Note: Label each wire with a piece of tape and a marker. This step makes it easier to reconnect everything when you install the new sensor.
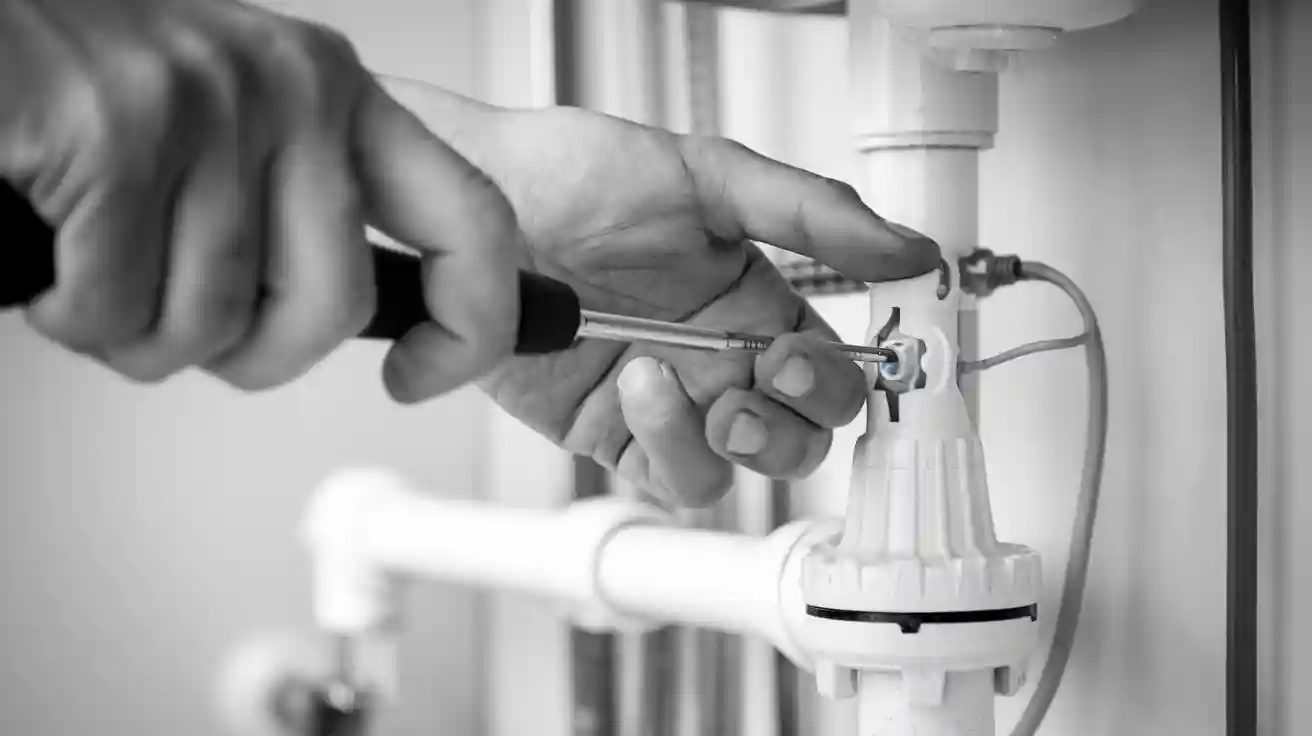
Remove Mounting Hardware
Now you are ready to remove the mounting hardware that holds the sensor in place. Different tanks use different types of mounts. You may see in-line, hot tap, or submersible mounts. Each type needs a special approach for safe removal.
Here is a table that shows the most common mounting types and how they work:
| Mounting Type | Description |
|---|---|
| In-line Sensor Mounting | Used on sample streams; needs isolation valves for safe removal. |
| Hot Tap Sensor Mounting | Lets you remove the sensor under pressure using a ball valve for isolation. |
| Submersible Sensor Mounting | Used for direct measurement in tanks; usually mounted on a dip tube for submersion. |
To remove tank sensors, follow these steps:
- Gather the right tool for the job. Use a tool with a square hole that matches the sensor’s shape.
- Avoid sharp tools. Sharp tools can scratch or break the sensor, which may cause leaks.
- Gently twist the sensor back and forth. This action helps loosen it from its mount.
- Once the sensor feels loose, slowly pull it away from the tank. Move carefully to avoid damaging the tank or causing leaks.
If you see any water dripping or hear a hissing sound, stop right away. These signs may mean you have a leak. Fix any leaks before you continue. Always check the mounting area for cracks or worn seals. Replace any damaged parts to prevent future leaks.
Safety Alert: Never force a sensor out of its mount. Forcing it can break the sensor or the tank, leading to leaks and costly repairs.
Carefully Extract Water Sensors Removed
You need to take extra care when you extract water sensors from your tank. Rushing this step can damage the sensor or the tank. Follow these steps to remove the sensor safely and keep your equipment in good shape.
Step-by-Step Extraction Process:
-
Grip the Sensor Firmly
Hold the sensor with both hands. Use a steady grip, but do not squeeze too hard. If the sensor feels slippery, dry your hands or use a cloth for better control. -
Wiggle Gently
Move the sensor back and forth with small motions. This action helps loosen any debris or buildup around the sensor. Do not twist or bend the sensor too much. You want to keep the sensor straight as you pull. -
Pull Out Slowly
Pull the sensor straight out from its mount. Use slow and even pressure. If you feel resistance, stop and check for leftover mounting hardware or sticky residue. Forcing the sensor can break it or crack the tank. -
Watch for Leaks
As you remove the sensor, look for any signs of water or fluid leaking from the opening. If you see a leak, press a clean cloth against the area right away. This step helps prevent spills and keeps your workspace safe. -
Inspect the Sensor and Opening
Once you remove the sensor, check it for cracks, corrosion, or buildup. Look at the opening in the tank as well. Make sure there are no broken pieces left inside. If you see any damage, note it for repairs.
Tip: Place the removed sensor on a clean, dry surface. Use a tray or towel to keep it safe from dirt or damage.
Common Mistakes to Avoid:
- Do not use sharp tools to pry the sensor out. Sharp tools can scratch or break the sensor.
- Do not yank or twist the wires. Always disconnect wires before you pull the sensor.
- Do not ignore resistance. If the sensor feels stuck, check for hidden screws or clips.
Quick Checklist for Safe Extraction:
- [ ] Power and water supply turned off
- [ ] Electrical connections disconnected
- [ ] Mounting hardware removed
- [ ] Sensor gripped firmly
- [ ] Sensor pulled out gently
- [ ] Area checked for leaks
- [ ] Sensor and opening inspected
Alert: If you notice any damage to the tank or sensor during removal, stop and consult a professional. Fixing problems early can save you time and money.
You protect your equipment and yourself when you extract water sensors with care. Careful removal also makes cleaning and replacement much easier. Always follow these steps to keep your system running smoothly.
How to Clean and Maintain Water Sensors
Cleaning Methods for Holding Tank Sensors
You need to know how to clean your sensors to keep your readings accurate. Start by dumping the tank completely. This step removes waste and makes it safe to work. Next, use a pulse-rinse method. Turn on your built-in flush or use a rinser wand for about 30 to 60 seconds. Close the valve and wait for 30 seconds. Repeat this process three or four times until the water coming out looks lighter. After rinsing, prime the tank and add a cleaner like Happy Campers Extreme Cleaner. Follow the directions on the label for the best results. These steps help you clean the holding tank and remove buildup from the sensors. Regular sensor cleaning keeps your readings reliable and helps prevent false alarms.
Tip: Always use cleaners that are safe for your tank and sensors. Harsh chemicals can damage the sensor surface and affect readings.
Frequency of Maintenance and Cleaning
You should set a schedule for sensor cleaning and maintenance. In some places, you may need to clean sensors more than once a day. During busy times, such as peak production, clean and calibrate your sensors at least three times daily. Using automatic cleaning systems can lower your maintenance work by up to 80%. This routine helps you avoid sensor errors and keeps your readings steady. If you notice your readings change or become less accurate, increase your cleaning frequency. Always check your sensors after cleaning to make sure they work well.
- Clean sensors often in high-use environments.
- Use cleaning systems to save time and effort.
- Check readings after every cleaning.
Battery Checks and Sensor Lifespan
You need to check the battery and lifespan of your sensors to keep your readings accurate. Different sensors have different lifespans and battery needs. Here is a table to help you compare:
| Sensor Type | Average Lifespan | Battery Performance |
|---|---|---|
| Ooma Water Sensor | ~1.5 years | Notifications for low battery ensure timely replacements |
| iopool EcO Sensor | Minimum 2 years | High-performance battery with low power consumption, operates up to 3 years before component replacement required |
Check your sensor’s battery often. Replace batteries when you get a low-battery alert. This habit keeps your readings steady and prevents sensor failure. Always follow the manufacturer’s advice for battery changes and sensor replacement. Good battery care and regular sensor cleaning help you get the most out of your sensors and keep your readings correct.
Replace Holding Tank Sensors and Upgrade Options
Factors to Consider When Replacing Holding Tank Sensors
When you decide to replace holding tank sensors, you need to look at several important factors. Choosing the right sensor helps you avoid problems and keeps your rv black tank sensors working well. Here are the main things you should consider:
- Type of tank
Each tank has its own needs. Freshwater, gray water, and black water tanks may need different rv black tank sensors. - Type of substance
The material inside the tank, such as water, waste, or chemicals, affects which sensor works best. - Environmental conditions
Think about temperature and humidity. Some sensors work better in hot or damp places. - Accuracy and resolution
Decide how precise you want your readings. Some rv black tank sensors give more detailed results. - Range
Make sure the sensor can measure the full depth of your tank. - Installation and maintenance
Pick sensors that are easy to install and clean. This step saves you time during upgrades. - Cost
Set a budget before you shop. Some upgraded sensors cost more but last longer or give better results.
Tip: Write down your tank’s details before you shop for new rv black tank sensors. This habit helps you find the best match for your system.
Recommended Sensor Models and Features
You have many choices when you want to upgrade your rv black tank sensors. Some models stand out for their features and reliability. The table below shows some of the most highly rated options and what they offer:
| Sensor Model | Key Features |
|---|---|
| LeakPro LDS Polypropylene Leak Sensor | Affordable, compact, chemical resistant, precise detection, versatile for various setups. |
| Wireless Tank Gauge | Universal compatibility, wireless setup, budget-friendly, user-friendly interface, durable design. |
| Levelpro Submersible Electronic Sensor | Submersible design, flexible power options, rugged construction, accurate level monitoring. |
| ProAlert Visual and Audible Alarms | Dual alert system, customizable configurations for integration into existing systems. |
You can also look at these popular rv black tank sensors for your next upgrade:
- RecPro RV Water Tank Probe Sensors: These use stainless steel, resist rust, and are easy to install.
- Valterra T21301VP RV Horst Miracle Probes: These give accurate readings and help prevent false readings. You can install them in many types of tanks.
- RecPro Miracle RV Holding Tank Sensors: These have an extended sensory pin and a hood design. This setup helps reduce false readings.
Smart technology has changed how you monitor your tanks. Cities and farmers now use smart sensors for real-time monitoring. One city in California cut water waste by 30% with upgraded sensors. Farmers use smart rv black tank sensors to track water and soil moisture, which helps them save water and grow better crops.
Note: Upgraded sensors often connect to wireless systems. You can check your tank levels from your phone or a display panel.
Installation Tips for New Holding Tank Sensors
You want your new rv black tank sensors to work well after you install them. Follow these tips to get the best results from your upgrade:
- Choose the right sensor
Make sure the sensor matches your tank type and the substance inside. - Install the sensor correctly
Read the manufacturer’s instructions. Each sensor may have special steps for mounting and wiring. - Position the sensor
Mount the sensor on the side or bottom of the tank, depending on your tank and sensor type. - Connect the sensor to the meter
Use the correct cable to link the sensor to your monitoring device. This step ensures you get accurate readings. - Test the sensor
After you install the sensor, check that it gives the right readings. Adjust the position if needed. - Calibrate the sensor
Calibration keeps your rv black tank sensors accurate. To calibrate, start with an empty tank. Hold the tank reading button, then press and hold the ‘Empty’ calibration button for four seconds. Wait for the lights to flash three times. Fill the tank, then repeat the process with the ‘Full’ calibration button. The lights will flash again to confirm. - Clean and inspect regularly
Check your sensors for dirt, corrosion, or damage. Clean them as needed to keep them working well. - Replace as needed
Even the best rv black tank sensors wear out. Replace them when you notice problems or after several years of use.
Tip: Keep a maintenance log for your rv black tank sensors. Write down when you install, clean, calibrate, or replace each sensor.
Routine inspections and cleaning help your upgraded sensors last longer. Always follow the manufacturer’s advice for care and calibration. When you upgrade your rv black tank sensors, you get more reliable readings and fewer problems with your tank system.
Troubleshooting and Best Practices for Water Sensors Removed
Common Challenges During Removal
You may face several challenges when you remove sensors from holding tanks. Many people notice that sensors read full even after a dump. This problem often happens because residue builds up on the sensor, not because the sensor is broken. Dirty sensors, especially in black tanks, can give false readings due to waste or toilet paper stuck on them. Grease and solid waste also cause buildup. Sometimes, the bottom of the tank sags, which lets sediment collect and affects how the sensors work. If you see these issues, do not worry. You can fix most problems with a good cleaning after a dump.
- Sensors may read full after a dump because of residue.
- Toilet paper, grease, and solid waste cause buildup.
- Sagging tank bottoms let sediment collect and affect sensors.
Tip: Always dump your tank fully before you start troubleshooting. This step helps you see if the problem is just buildup.
Post-Removal Inspection and Checklist
After you remove the sensors, you need to inspect both the sensor and the tank. Start by checking for leaks around the opening. Look for cracks, worn seals, or leftover debris. Use a fast diagnosis checklist to make sure you do not miss anything:
- Check for leaks at the sensor opening.
- Inspect the sensor for cracks or buildup.
- Look inside the tank for stuck waste after a dump.
- Make sure the mounting area is clean and dry.
- Confirm that all wires are safe and labeled.
A fast diagnosis checklist helps you spot problems early. If you find damage, fix it before you install new sensors. This habit keeps your system safe and working well.
Safety Reminders and Final Steps
You must always put safety first when you finish your work. Wear gloves and eye protection until you finish the job. Clean up any spills right away. If you used chemicals to clean the tank after a dump, wash your hands and tools. Before you reconnect anything, check for leaks again. Test the new sensors to make sure they work. If you hear odd noises or smell something strange, stop and review your troubleshooting steps. Data-driven diagnostics and root cause analysis help you find the real problem. Use process of elimination if you still have trouble. Monitor equipment readings and test electrical parts to avoid surprises.
Note: Keep a record of each dump, cleaning, and repair. This log helps you track sensor performance and plan future maintenance.
You protect your system when you follow each step for water sensors removed. Always turn off power, wear safety gear, and check for leaks after water sensors removed. Clean and inspect water sensors removed often to keep readings accurate. Replace old or damaged water sensors removed right away. Use this checklist for success:
- Rinse sensors with distilled water
- Inspect sensor tips for cracks
- Check cable connections
- Calibrate with standard solutions
- Clean probe tips and mounting surface
- Replace faulty probes
- Confirm correct labeling and tag numbers
FAQ
How often should you clean your water sensors?
You should clean your water sensors every month. If you use your tank more often, clean the sensors every two weeks. Regular cleaning helps you get accurate readings and prevents buildup.
What should you do if a sensor gets stuck during removal?
Stop and check for hidden screws or clips. Do not force the sensor out. Use gentle wiggling to loosen it. If it still will not move, contact a professional for help.
Can you reuse old mounting hardware when installing new sensors?
You can reuse mounting hardware if it looks clean and undamaged. If you see rust, cracks, or worn parts, replace them. New hardware helps you avoid leaks and keeps your system safe.
Why do sensors sometimes show a full reading after emptying the tank?
Buildup from waste or toilet paper can stick to the sensor. This causes false readings. Clean the tank and sensors to fix this problem. If the issue continues, check for sensor damage.
What safety gear do you need when working with water sensors?
Wear gloves, safety glasses, long sleeves, and closed-toe shoes. Use a face mask if you work in a small space or near strong odors. Safety gear protects you from cuts, chemicals, and bacteria.