RVにワイヤレスプロパンゲージを設置する方法 (ステップバイステップのプロガイド)
正直に言おう. There's no worse feeling than the 2 その上での "click" of the RV furnace shutting off, followed by a blast of cold air. Or maybe it’s the mid-shower cold-water surprise. You're left standing there, towel-in-hand, realizing you've run out of propane again.
の "ゲージ" on most RVs (if you can even call them that) are notoriously useless. And let's face it, "sloshing" the tank to guess the level is a rookie move that just doesn't work.
You need data. You need a real gauge.
私の 15+ years of working on RV systems, I've installed dozens of wireless propane gauges. They are, 疑いなく, one of the best quality-of-life upgrades you can make. But the installation process can be confusing, and doing it wrong isn't just frustrating—it can be dangerous.
This guide will give you the step-by-step pro method. I'll show you how to install a wireless propane gauge on your RV, 何だって じゃない to do, and how to avoid the common pitfalls and troubleshooting headaches that most other guides don't even mention.
まずは, Which タイプ of Gauge Are You Installing? (This is Critical)
Here’s the first mistake I see people make. They buy a "wireless gauge" without realizing there are two completely different technologies, and the installation is じゃない the same. What competitors often do is lump them all together, which is confusing and unhelpful.
Let's clear that up right now.
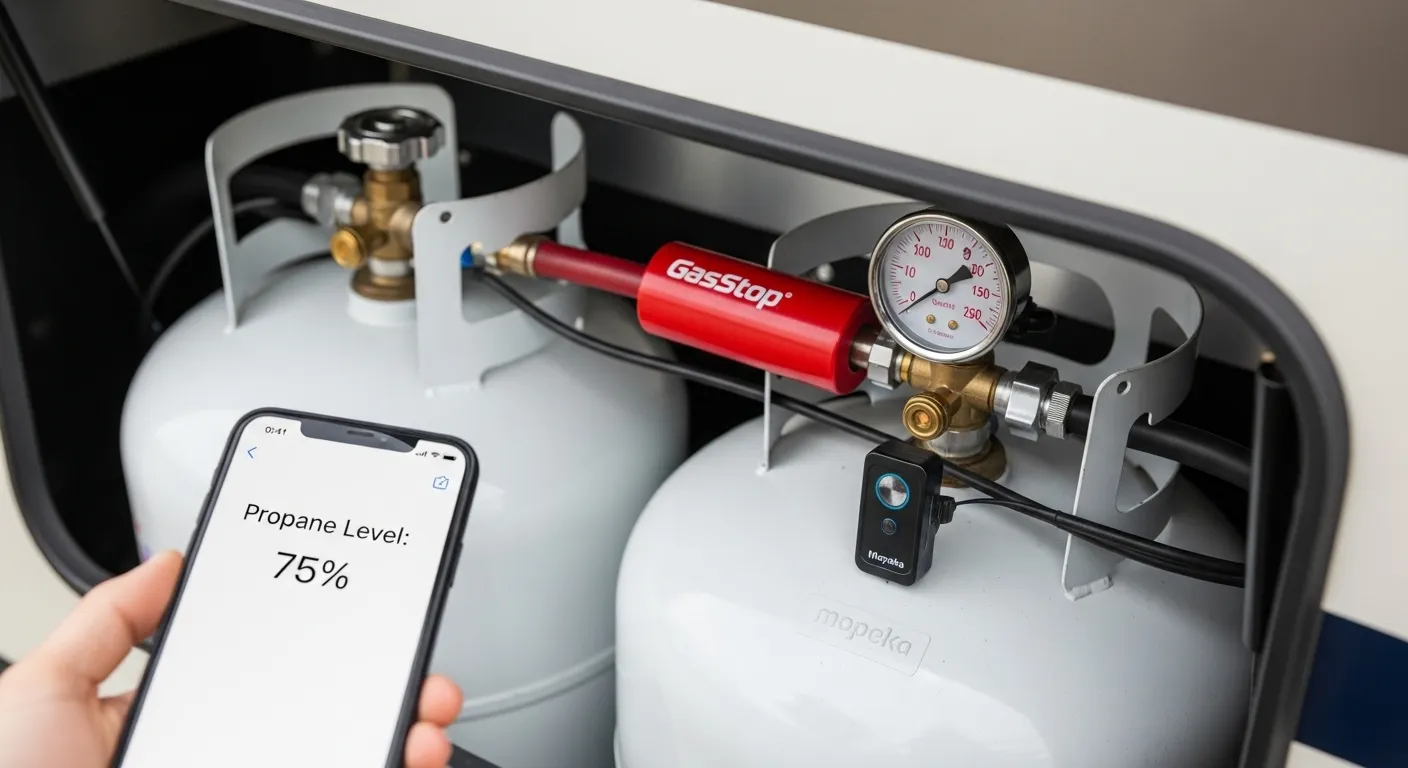
タイプ 1: In-Line Pressure Gauges (例えば。, AP製品, ガスストップ)
These are very common and often include safety features.
- 仕組み: This gauge installs in-line, sitting between your tank's main valve and your RV's regulator pigtail. It measures the プレッシャー of the gas in the line. 多い (like the GasStop) also act as an emergency shut-off, stopping a major leak if the hose ruptures.
- 長所: Very easy to install, no batteries on the gauge itself (often the monitor is), and adds a significant safety feature.
- 短所: これは not a true level gauge. それは "you're almost out" warning. Propane pressure in a tank stays relatively consistent until the liquid is almost gone (頃 10-15% 満杯). It won't tell you if you're at 70% または 30%.
タイプ 2: 超音波センサー (例えば。, モペカ, BMPRO)
This is the technology you want if you 実は want to know your tank's level.
- 仕組み: This sensor (usually magnetic) sticks to the 底 あなたの戦車の. It sends an ultrasonic (sonar) pulse up to find the liquid level and reports the actual percentage back to a phone app or a dedicated monitor.
- 長所: 非常に正確. It tells you you're 70% 満杯, 50% 満杯, 等. This is what lets you plan for a long boondocking trip.
- 短所: The installation is finicky. それ only works on steel tanks (not aluminum), requires a perfectly clean surface, and your tank needs about 1/2" of ground clearance for the sensor to fit.
My advice? If you want to know その通り how much propane you have for a long trip, get the ultrasonic sensor. If you just want a better "almost empty" warning and added peace of mind from a safety shut-off, the in-line gauge is a great choice.
ステップバイ ステップ: Installing an In-Line Pressure Gauge
大丈夫です, so you've got your in-line gauge. Let's get this done in about 15 分.
安全第一 & Tool Prep
SAFETY WARNING: We are working with flammable gas. DO NOT perform this installation near どんなものでも 火の開いた炎, sparks, or ignition sources. That means no water heater pilot light, no smoking, and no running your generator. Turn off all propane appliances inside the RV.
You'll need a few specific tools:
- Two (2) adjustable wrenches. (又は, if you want to be precise, often a 1" そして 1-1/4" open-end wrench).
- Propane-rated pipe thread sealant. これは じゃない the white Teflon tape for water. It must be the 黄色 high-density Teflon tape or a liquid sealant specifically rated for propane.
- A gas leak detector solution.
Turn Off and Disconnect the Tank
- Close the Tank Valve: Turn the service valve on your propane tank clockwise until it's firmly closed (hand-tight is fine).
- Bleed the Line: Go inside your RV and turn on a stove burner. It will light for a second and then go out. This bleeds off any residual pressure in the line. Turn the stove burner back off.
- Disconnect the Pigtail: Use your wrench to loosen and remove the "pigtail" (the main ACME nut fitting) from the tank valve.
Install the In-Line Gauge
- Check the threads on your new gauge. If it has male pipe threads (NPT) that will screw into a fitting, you need to apply thread sealant. Apply the yellow Teflon tape clockwise (with the direction of the threads) 3-4 倍.
- Hand-thread the gauge onto the tank valve.
- The Pro-Tip: 今, grab your 2 レンチ. Use one wrench to hold the tank fitting perfectly still. Use the second wrench to tighten the ゲージ onto that fitting. Brass is a soft metal. If you just crank on the gauge with one wrench, you can easily crack the fitting or the tank valve. これ "two-wrench method" is non-negotiable.
Reconnect the Regulator Pigtail
今, attach your RV's pigtail hose to the outlet side of your new gauge. This fitting (the big ACME nut) usually has a rubber O-ring and doesn't require thread sealant. Hand-tighten it firmly.
The Critical Leak Test (The Pro Way)
Most guides just say, "use soapy water." That's lazy and potentially bad advice.
Here's the problem: Many common dish soaps (like many varieties of Dawn) contain アンモニア, which can cause brass fittings to become brittle and crack over time.
- The Better Way: Use a 50/50 mix of a known ammonia-free soap (like original blue Dawn or Ivory) and water.
- The Best Way: Buy a small bottle of professional gas leak detector solution from a hardware or plumbing supply store. It's cheap and designed for this.
Here's the process:
- Slowly open the tank valve. You might hear a small "click" as the gauge's safety valve (if equipped) pressurizes.
- Generously spray or daub your leak solution on all the connections you just touched: the tank-to-gauge connection and the gauge-to-pigtail connection.
- What to look for: You aren't just looking for liquid running. あなたが探しているのは ちっぽけ, 泡が成長する または "泡" that expands.
- もしあなたが見たら どんなものでも bubbles, shut the tank valve immediately, bleed the line, and retighten the leaking connection. Then test again. Don't stop until you have zero bubbles.
Sync the Monitor/App
This is the easy part. Follow your manufacturer's instructions. It usually involves pressing a button on the gauge or monitor to sync them. Place the monitor inside your RV, and you're done.
ステップバイ ステップ: Installing an Ultrasonic (Bottom-Mount) センサー
This installation isn't hard, but it is finicky. Getting it right is all about the prep work.
Prep the Tank
This is where 90% of ultrasonic sensor installations fail.
- Confirm It's Steel: Take a magnet and stick it to your tank. If it sticks, you're good. If it's an aluminum tank, やめて. This sensor will not work.
- Clean the Bottom: The sensor needs perfect contact with the metal. The bottom of your tank is probably covered in dirt, 脂肪, and rust scale. You must clean it.
- Use a scouring pad or sandpaper to remove any flaking rust or paint.
- Use an alcohol wipe or a degreaser to get the center of the tank bottom squeaky clean and dry.
Apply Dielectric Grease
Your sensor kit likely came with a small tube of grease. これは じゃない 任意.
This is a "couplant." The sensor works by sound, and air is a terrible conductor of sound. This grease ensures a solid connection between the sensor's rubber pad and the tank metal. Apply a generous dab of the dielectric grease to the sensor's pad.
Position the Sensor
Look at the bottom of your tank. You want to place the sensor directly in the center. Avoid any weld seams. The sensor is magnetic, so it should snap right into place on the clean, greased spot.
Install Spacers (必要な場合)
The sensor just added about 1/2" of height to the bottom of your tank. 今, try to place the tank back in its mounting tray. Does it wobble? Does it not sit flat on its foot-ring?
Most good kits (like Mopeka's) come with three or four little rubber "spacers" または "feet." These stick to the bottom foot-ring (the collar) of the tank to lift the whole tank up by 1/2", allowing the sensor to sit in the middle without touching the tray.
Install these spacers, then put the tank back in its tray and secure it as normal with its retaining straps.
Sync the Monitor and App
Turn on the sensor (there's usually a small button). Open the phone app (like the Mopeka app) or the dedicated monitor. Follow the pairing instructions (it's usually just Bluetooth). Some systems even offer Wi-Fi-enabled monitors that let you check levels from anywhere.
You will need to input your tank size (例えば。, 20 ポンド, 30 ポンド, 40 ポンド) into the app for it to be accurate. It measures the liquid height, then the app calculates the percentage based on the tank size you entered.
Monitor Not Syncing? Sensor Reading 0%? (Troubleshooting Guide)
私の経験では, this is the #1 complaint I hear, and the fix is almost always simple.
問題: 信号なし / Inaccurate Reading (超音波センサー)
- 解決 1 (の 90% 修理する): Your tank bottom is dirty. I know you think you cleaned it, but it's not clean enough, or you forgot the grease. Take it off, re-clean the steel until it's shiny, re-apply the grease, and stick it back on. This fixes it almost every time.
- 解決 2 (の 5% 修理する): You have an aluminum tank. A magnet won't stick to it, and the sensor won't work.
- 解決 3 (The Signal Fix): The sensor's signal (ブルートゥース) is being blocked. Your tanks are in a steel box (the tray) inside a metal-framed RV. If your monitor is at the other end of a 40-foot fifth wheel, the signal just won't make it. Try moving the monitor closer, like in the pass-through bay or a front cabinet. Some kits offer an "アンテナ" version for this exact reason.
問題: In-Line Gauge Reads "一杯" Until It's Suddenly "空"
- 解決: It's not broken. That's just how it works. 覚えて, it's a プレッシャー ゲージ, not a レベル ゲージ. The pressure will read "一杯" または "緑" 対して 85-90% of the tank's life. It's only a warning for the end 戦車の. This is normal.
問題: My App Won't Pair
- 解決 1: Check the sensor battery. They're usually a small CR2032 coin cell that's easy to replace.
- 解決 2: The classic IT fix: turn your phone's Bluetooth off and on again.
- 解決 3: Press the "sync" button on the sensor while the app is actively searching for it.
結論
Installing a wireless propane gauge is one of the single best quality-of-life upgrades you can buy for your RV. It replaces the anxiety of guesswork with the confidence of hard data. No more 2 AM surprises.
Just remember these key takeaways:
- Choose the right gauge: 超音波 (モペカのように) for an actual percentage level or an In-line (GasStopのように) 対して safety and an "almost empty" warning.
- Leak Test: For in-line gauges, the leak test is the most critical step. Use the right (ammonia-free) solution and look for growing bubbles.
- Prep the Tank: For ultrasonic gauges, the most critical step is getting the tank bottom perfectly clean and using the dielectric grease.
With this job done, you can pour a cup of coffee, check your phone, and know その通り how much propane you have for the week.
Now that your propane system is monitored, what's next? Make sure the rest of your rig is just as ready for adventure. Check out our [Ultimate RV Maintenance Checklist] to keep your rig running smoothly all season.
よくある質問 (FAQ)
How accurate are wireless RV propane gauges?
種類によります. 超音波センサー (モペカのように) that measure the actual liquid level are extremely accurate, 多くの場合、 1-2%. In-line プレッシャー gauges are not accurate for レベル—they are only accurate for telling you when the tank is nearly empty.
Will a Mopeka sensor work on aluminum propane tanks?
いいえ. Ultrasonic sensors are designed to work with steel tanks, which is what most RVs use. They use a magnet to attach and are calibrated for the density of steel. They will not work on aluminum or composite tanks.
How long do the batteries last in a wireless propane sensor?
For ultrasonic sensors that stick to the bottom, the small CR2032 coin cell battery typically lasts 1-2 年, depending on use. They are cheap and easy to replace. In-line gauges often have a monitor that is hard-wired or uses AA batteries, which last for a season or more.
Can I install a propane gauge myself, or do I need a pro?
This is a very common DIY project. As long as you are comfortable working with basic hand tools and are extremely careful about the propane leak test, you can absolutely install either type of gauge yourself. 疑わしい場合, hire an RV tech.
What is the best leak detector solution for propane?
The best solution is a professional, non-corrosive gas leak detector fluid (例えば。, "Snoop"). The next best is a 50/50 mix of water and an ammonia-free soap (like original blue Dawn or Ivory). Never use a soap that contains ammonia, as it can make brass fittings brittle.
Why does my propane gauge read differently in hot vs. 冷気?
Propane pressure is directly related to temperature. On a hot day, the pressure in the tank rises. On a cold day, it drops. This will dramatically affect the reading of an in-line プレッシャー ゲージ, making it look fuller on hot days. ひとつの 超音波 gauge is not affected by temperature, as it's measuring the physical liquid level.