How to Replace a Propane Tank Gauge from Home Hardware
Imagine you’re mid-barbecue, flipping burgers, and the propane tank sputters out. You thought you had plenty of gas, but your old gauge was lying. Frustrating, right? A faulty or broken propane tank gauge can turn a great cookout into a scramble. Replacing it is easier than you think, and Home Hardware has solid options to keep you grilling without the guesswork. In this guide, we’ll walk you through how to replace a propane tank gauge, compare top models available at Home Hardware, and share tips to make the process smooth. Let’s fire it up!
Why Replace a Propane Tank Gauge?
A propane tank gauge measures the propane level in your tank, typically 5- to 40-pound cylinders for BBQs, camping, or RVs, or larger 100–500-gallon tanks for home heating. Over time, gauges can fail due to wear, debris, or damage, leading to inaccurate readings or complete failure. Here’s why replacement is crucial:
- Inaccurate Readings: A worn gauge might show “full” when the tank’s nearly empty, risking unexpected shutdowns during a BBQ or camping trip.
- Stuck or Broken Gauges: Floats can jam, dials can stick, or sensors can fail, rendering the gauge useless.
- Safety Risks: Faulty gauges may miss leaks or overuse, increasing risks in tight spaces like RVs or patios.
- Aging Equipment: Gauges often last 3–5 years (per Home Depot reviews), but harsh weather or frequent use can shorten their lifespan.
- Upgrading Technology: Replacing an old mechanical gauge with a smart or electronic one adds precision, app alerts, and leak detection.
Replacing a propane tank gauge restores reliable fuel monitoring, ensuring you’re never caught off-guard by an empty tank.
Who Needs to Replace a Propane Tank Gauge?
If you rely on propane, a gauge replacement might be on your horizon. Here’s who’ll benefit:
- BBQ Enthusiasts: A broken gauge can ruin a cookout. Replace it to ensure your 20-pound tank is ready for grilling.
- RV Campers: Propane powers RV stoves, fridges, and heaters. A faulty gauge risks cold nights or spoiled food on remote trips—like a family in the Smokies needing a reliable refill plan.
- Tent Campers: Using portable stoves or lanterns? A working gauge keeps your 5-pound tank fueled for the whole trip.
- Tailgaters: Grilling at games? A new gauge confirms your tank’s set for the entire tailgate.
- Homeowners: Using propane for heating or generators? Replace gauges on 100–500-gallon tanks to schedule deliveries accurately.
- Off-Grid Dwellers: For cabins or tiny homes, a reliable gauge minimizes supply runs in remote areas.
From casual grillers to off-grid adventurers, replacing a propane tank gauge is essential for anyone with a malfunctioning or outdated gauge.
Benefits of Replacing a Propane Tank Gauge
Why invest in a propane tank gauge replacement? Here’s why it’s worth it:
- Restored Accuracy: A new gauge ensures you know exactly how much propane is left, preventing mid-BBQ or camping shutdowns.
- Enhanced Safety: Modern gauges (especially electronic/smart) detect leaks or issues, reducing risks in RVs or patios. X users praise smart gauges like Mopeka for catching leaks early.
- Cost Savings: Accurate monitoring avoids emergency refills ($10–$20 extra, per X users) and wasted propane. Frequent users could save $50+ per season.
- Upgraded Features: Replacing an old mechanical gauge with a smart one adds app alerts, usage tracking, and remote monitoring—perfect for campers or homeowners.
- Te rangimarie o te hinengaro: A reliable gauge lets you focus on grilling, camping, or heating without worrying about fuel levels.
Replacing your gauge is a small fix with a big impact, keeping your propane-powered life smooth and stress-free.
Types of Replacement Propane Tank Gauges
Replacement propane tank gauges come in various styles to suit different needs and budgets. Here’s a breakdown to find your perfect match:
- Mechanical Gauges
- Pros: Affordable ($10–$30), no batteries, easy to screw on, simple dial display.
- Cons: Less accurate near empty (10–20% accuracy); cold weather can skew readings.
- Best For: Casual grillers or campers replacing a basic gauge..
- Electronic Gauges
- Pros: High accuracy (1–2%), digital displays, some with leak detection or app sync, mid-range cost ($50–$150).
- Cons: Requires batteries, setup can be complex.
- Best For: RV campers or tailgaters wanting reliable data.
- Smart Gauges
- Pros: Remote monitoring via apps, top accuracy, leak alerts, usage tracking, long battery life (up to 4 years for Mopeka, per X users).
- Cons: Pricier ($100–$300+), needs Bluetooth/Wi-Fi, app setup required.
- Best For: Tech-savvy campers or homeowners upgrading for safety and convenience.
- Scale-Based Gauges
- Pros: Ultra-accurate by weighing the tank, portable, no tank mods, affordable ($20–$50).
- Cons: Requires lifting the tank (~20–38 pounds), less convenient for frequent checks.
- Best For: Campers or grillers needing precision and willing to lift.
- Built-In Gauges (Tank-Integrated)
- Pros: No extra purchase, part of the tank’s valve (common in 100–500-gallon home tanks), easy to read.
- Cons: Replacement requires professional servicing, rare in portable tanks, less accurate over time.
- Best For: Homeowners with large tanks needing valve gauge replacement.
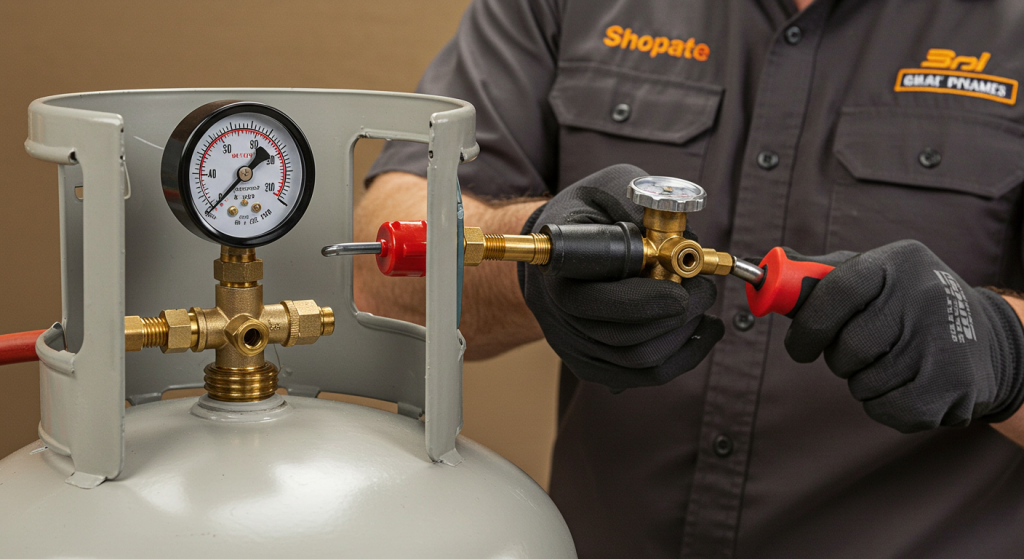
How to Replace a Propane Tank Gauge
Replacing a propane tank gauge varies by type (attached or built-in). Attached gauges are DIY-friendly; built-in gauges often need professional help. Here’s how to do it, plus troubleshooting tips:
Replacement Steps (For Attached Gauges)
- Assess the Old Gauge: Confirm it’s faulty (e.g., stuck dial, inaccurate readings). Test with a full tank—it should read “full.” If not, replacement is needed.
- Choose a Replacement: Match the new gauge to your tank (5–40-pound with QCC1/Type 1 valves for most campers/BBQers). Ensure steel vs. aluminum compatibility.
- Prepare the Tank:
- Place the tank upright in a shaded, ventilated area, away from flames or sparks.
- Turn off the valve and disconnect from appliances (e.g., grill, RV stove).
- Remove the Old Gauge:
- Unscrew the old gauge counterclockwise by hand. If stuck, use a wrench gently to avoid damaging the valve.
- Inspect the valve threads for damage or debris—clean with a cloth if needed.
- Install the New Gauge:
- Mechanical/Electronic: Screw the new gauge into the valve clockwise by hand until snug (expect a click from the safety valve). Don’t overtighten.
- Smart: Attach magnetically (e.g., Mopeka) at the tank’s bottom midpoint. Apply included grease for a secure fit.
- Scale: Place on a flat surface; no valve attachment needed—lift the tank onto it.
- Calibrate (If Needed):
- For electronic/smart gauges, fill the tank and set to “full” in the app or manual.
- For scales, input the tare weight (~17–18 pounds for a 20-pound tank).
- Connect (Smart Gauges): Download the app (e.g., Mopeka TankCheck), pair via Bluetooth/Wi-Fi, and test the connection.
- Test for Leaks: Open the valve slowly and apply soapy water to connections. Bubbles mean a leak—tighten or get professional help. Fire up a burner briefly to clear air.
- Verify the Reading: Check the new gauge with a full or known-level tank. It should match (e.g., “full” for a new tank). If off, reattach or recalibrate.
Replacing Built-In Gauges
- Identify the Issue: Built-in gauges (common in 100–500-gallon home tanks) are part of the valve assembly. If faulty (e.g., stuck or inaccurate), replacement is complex.
- Contact a Professional: Built-in gauge replacement requires valve disassembly, risking leaks. Call your tank supplier (e.g., Manchester Tank) or a licensed propane technician.
- Temporary Workaround: Use an attached gauge (e.g., Mopeka) or hot water method until the built-in gauge is serviced.
- Cost: Professional replacement can cost $100–$300, depending on tank size and labor.
Troubleshooting Tips
- New Gauge Reads Wrong:
- Mechanical: Cold weather or improper threading may cause errors. Wait for milder temps, reattach, or replace if defective.
- Electronic/Smart: Recalibrate, ensure the sensor’s clean and at the midpoint. Check batteries (lasting 1–2 years, up to 4 for Mopeka, per X users).
- Scale: Ensure a flat surface and correct tare weight. Test with a known weight (e.g., 10-pound dumbbell).
- No Signal (Smart Gauges):
- Cause: Dead batteries or weak connectivity.
- Fix: Replace batteries (coin-type for Mopeka). Stay within Bluetooth range (~30 feet) or check Wi-Fi signal. Restart the app/device.
- Leak After Replacement:
- Cause: Loose connection or damaged valve threads.
- Fix: Test with soapy water. Bubbles? Shut off the propane, tighten, or call a pro. No bubbles? Gauge may be faulty—replace.
- Stuck Old Gauge:
- Cause: Rust or overtightening.
- Fix: Apply penetrating oil (e.g., WD-40), wait 10 minutes, and use a wrench gently. If stuck, call a pro to avoid valve damage.
Maintenance Tip: Clean new gauges monthly to remove grease or dirt. Store tanks upright in a dry, ventilated spot to prevent rust or damage. Check batteries annually for electronic/smart gauges—most last 1–2 years, per X reviews.
How to Choose the Right Replacement Propane Tank Gauge
Picking the perfect propane tank gauge replacement is like choosing the right camping gear—it’s gotta match your needs. Here’s what to consider:
- Tank hototahi: Most attached gauges fit 5–40-pound tanks with QCC1/Type 1 valves. For larger home tanks (100–500 gallons), confirm valve compatibility or opt for professional servicing of built-in gauges. Check steel vs. aluminum tanks.
- Tikanga: Mechanical gauges are budget-friendly but less precise (10–20% accuracy). Electronic/smart gauges offer 1–2% precision. Scales are exact but require lifting. Choose based on your need for accuracy (e.g., critical for RVs, less so for casual BBQs).
- Ease of Use: Mechanical gauges are screw-and-go. Smart ones need app setup (e.g., iOS/Android for Mopeka) but save time. Scales require lifting—pick what suits your routine.
- Features: Mechanical gauges are basic. Electronic gauges may include leak indicators. Smart gauges (e.g., Mopeka) offer app alerts, usage tracking, and leak detection, ideal for campers. Built-in replacements need pro features (e.g., R3D compatibility).
- Portability: Attached gauges are lightweight and easy to swap. Scales are portable but bulkier. Built-in gauges are fixed, best for home tanks.
- Budget: Mechanical ($10–$30), electronic ($50–$150), smart ($100–$300+), scales ($20–$50). Built-in gauge replacement costs $100–$300 (pro labor). X users say Mopeka’s $100 smart gauge is “worth it” for RVs.
- Durability: Weather-resistant gauges (e.g., Mopeka, Nexgrill) handle outdoor use (-40°F). Check warranties—Astor offers 1 year, CESH Home often longer.
A casual BBQer might replace a faulty gauge with a Nexgrill mechanical one, while an RVer might upgrade to a Mopeka smart gauge for app alerts.
CESH Home Solutions for Propane Tank Gauge Replacement
CESH Home is a top player with their propane tank gauge replacement solutions, offering reliable mechanical, electronic, and smart gauges for campers, BBQers, and homeowners. Their gauges are perfect for replacing faulty units with modern, user-friendly options. Here’s why they shine:
- Versatile Options: Choose from mechanical dials for simplicity, electronic gauges for precision, or smart gauges with app connectivity (iOS/Android) for real-time monitoring and alerts.
- Safety First: Smart and electronic gauges feature leak detection and auto shut-off alerts, protecting your RV, BBQ, or home, per X user reviews.
- Easy Replacement: Screw-on or magnetic mounts install in seconds, no tools needed. Clear instructions ensure a smooth swap from your old gauge.
- Camp-Tough Design: Weatherproof gauges handle rain, dust, and cold, ideal for outdoor camping or home use.
- Top Support: 24/7 help and a solid warranty ensure you’re covered, with X users praising CESH’s quick response for gauge issues.
CESH Home’s gauges are a hit for their reliability and ease, making them a top pick for replacing old or broken propane tank gauges. Upgrade to a CESH smart gauge for a seamless, high-tech experience.
FAQs About Propane Tank Gauge Replacement
Got questions? Here’s the scoop:
- How do I know if my gauge needs replacing?
If it’s stuck, shows inaccurate readings (e.g., “full” when empty), or fails to move, it’s time to replace. Test with a full tank to confirm. - Can I replace a gauge myself?
Attached gauges (mechanical, electronic, smart) are DIY-friendly—unscrew the old, screw on the new. Built-in gauges need professional servicing to avoid leaks. - Will a new gauge fit my tank?
Most attached gauges fit 5–40-pound tanks with QCC1/Type 1 valves. Check for aluminum or larger tanks. Built-in replacements are tank-specific. - How long do replacement gauges last?
Mechanical gauges last 3–5 years, electronic/smart 2–4 years with battery swaps, per Home Depot/X reviews. Built-in gauges last with the tank but may need servicing. - What if I suspect a leak after replacement?
Test with soapy water. Bubbles mean a leak—shut off the propane and get help. No bubbles? The gauge may be faulty—replace it. - Should I upgrade to a smart gauge?
If your old gauge was mechanical, smart gauges (e.g., Mopeka, CESH Home) add precision, app alerts, and leak detection, ideal for RVs or frequent use, per X users. - How much does replacement cost?
Attached gauges: $10–$30 (mechanical), $50–$150 (electronic), $100–$300+ (smart), $20–$50 (scales). Built-in gauge replacement: $100–$300 (pro labor).
Wāhanga whakamutunga
Replacing a propane tank gauge is a quick fix to keep your camping, grilling, or home heating on track. From restoring accuracy to adding smart features, it’s a small upgrade with a big impact. Whether you choose a budget-friendly Nexgrill mechanical gauge, a Bernzomatic electronic gauge, a high-tech Mopeka smart gauge, a Flame King scale, or a premium CESH Home solution, you’re set for success. Ready to camp, grill, or heat without worry? Visit CESH Home’s website, grab a top-notch replacement gauge, and keep your propane flowing. Now, hit the road or light that grill and enjoy!