Propane Tank Safety & Maintenance: A Complete Visual Guide
Running out of propane in the middle of a BBQ is frustrating. But not knowing if your tank is leaking, rusty, or long-expired? That's a serious hazard.
Here’s the problem: most "safety guides" just tell you what to check. They don't show you how to do it, leaving you to guess on the most critical steps.
This guide changes that.
We're going to walk you through the entire lifecycle of your propane tank—from reading its "birth date" to its safe disposal—with clear, visual, step-by-step instructions.
How We Created This Guide
To build this guide, we didn't just research. We took a standard 20lb tank and performed every test, check, and method, photographing the process so you can see exactly what to do and what to look for.
By the end, you'll know how to run a 5-minute safety audit, visually test for leaks, check your fuel level three different (and reliable) ways, and know exactly what to do with an old or expired tank. No more guesswork.
Emergency First: What to Do If You Smell Propane
First things first. If you smell propane, you need to act immediately. That distinct "rotten egg" or skunk-like odor is an additive called mercaptan, which is put in propane specifically to alert you to a leak.
Your only job is to get everyone to safety. Do not try to find the leak. Do not turn any lights on or off. Do not use your phone.
Here is exactly what you do. Memorize this.
- NO FLAMES. Immediately put out any open flames, including cigarettes.
- LEAVE THE AREA. Get yourself and everyone else away from the tank and the building or area immediately.
- SHUT OFF THE GAS (ONLY IF SAFE). If—and only if—you can safely reach the main gas shut-off valve on the tank or cylinder, turn it clockwise to close it. If you have any doubt, skip this step.
- CALL FOR HELP. From a safe distance (well away from the smell), call 911 or your local fire department.
- DO NOT RETURN. Do not go back to the area until a qualified professional or firefighter says it is safe.
The 5-Minute Propane Safety Audit (Do This Before Every Use)
This is the non-negotiable routine you should do every single time you fire up the grill or connect your tank. It takes less than five minutes, and it’s the single best way to catch a problem before it becomes a disaster.
Here’s your 5-point inspection.
- Check the Hoses: Look at the entire length of the hose from the tank to the appliance. You're looking for cracks, brittleness, or any signs of kinking. Give it a gentle bend (the "bend test") to see if small cracks appear. If you see any damage, don't use it.
- Inspect the Tank Body: Glance at the tank itself. Is it a dinged-up, rusty mess? Surface rust is often just ugly (we'll cover that later), but you're looking for deep, pitting rust, dents, or gouges that could compromise the tank's integrity.
- Check the Valve & O-Ring: Look at the main valve on top. It should be clean and free of grime or gunk. If you're using an exchange-style tank, peek inside the connection point—there should be a small, black rubber O-ring. If it's cracked or missing, don't use the tank.
- Glance at the Date: On the tank's collar, you'll see a bunch of stamps. You're looking for a date. Is it expired? (Don't worry, we'll show you exactly how to read this in the very next section).
- Clear the Area: This one is simple. Make sure your tank (and grill) is at least 10 feet away from any combustible materials—think deck railings, siding, or overhanging branches. You need a clear, open, well-ventilated space.
Pro Tip:
Pay close attention to the hoses. They are the #1 failure point on most setups. We recommend replacing them every 3-5 years, even if they look okay. It's cheap insurance.
How to "Read" Your Propane Tank: Decoding the Stamps
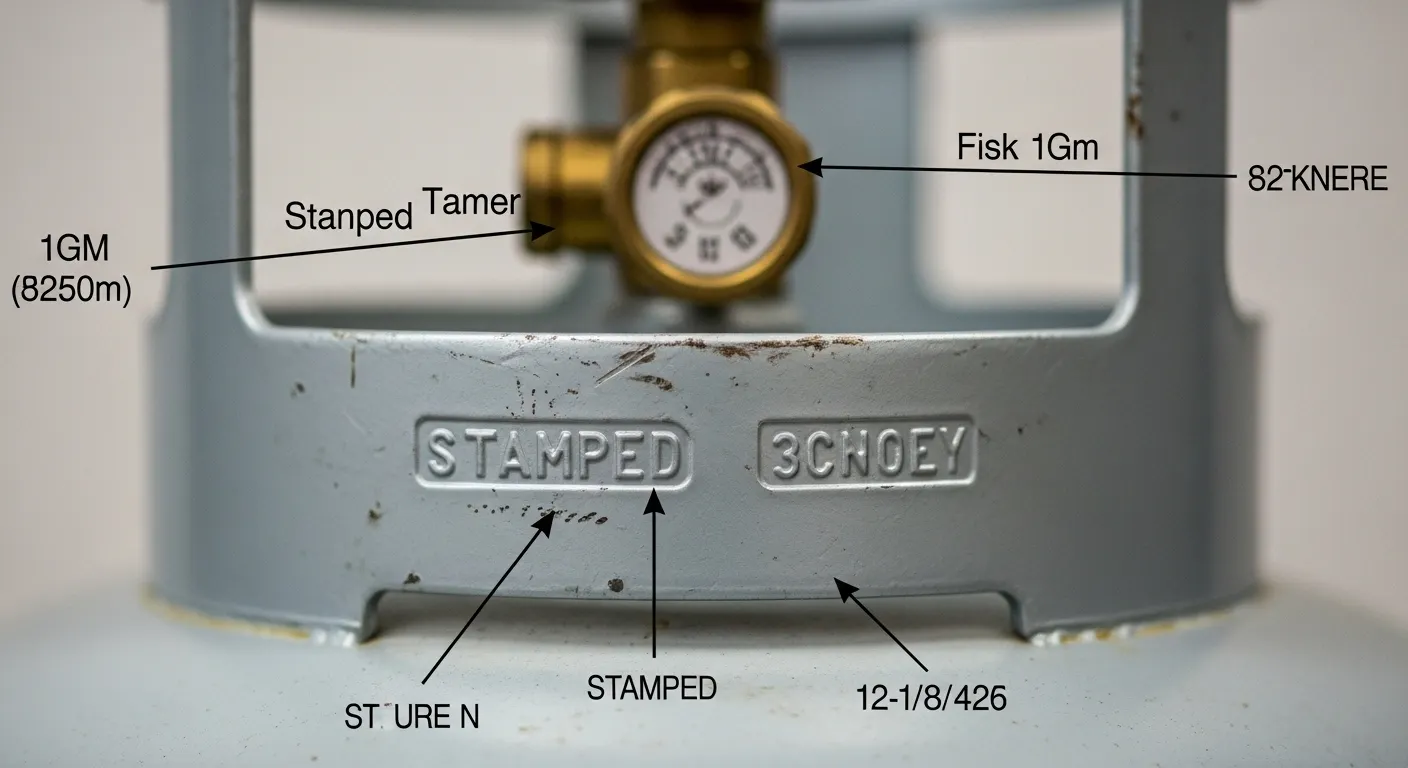
Okay, now for those confusing stamps on the tank's collar. It looks like a bunch of random "chicken scratch," but it’s actually your tank's instruction manual.
You can ignore most of them. You only need to find two key codes.
- "TW" (Tare Weight): This is the single most important number for checking your fuel level. "TW" stands for Tare Weight, which is what the tank weighs empty. You'll see it stamped as something like
TW 18.5orTW 17.0. This means your empty tank weighs 18.5 or 17.0 pounds. (Remember this number; you'll need it for the weighing method later.) - The Expiration Date: Tanks don't last forever. By law, a standard BBQ tank is only certified for 10 or 12 years from its manufacture date. You'll see this stamped as a date, often in a "MM-YY" format. For example,
05-25means your tank expires in May 2025. If you use a tank exchange service, they handle this. If you refill your own tank, a station will not fill an expired tank.
You might also see "OPD" mentioned, or notice your valve knob is a triangle. This stands for Overfill Protection Device, a safety feature required on all modern tanks. It's just a float mechanism that stops a fill station from filling the tank more than 80%, leaving room for the gas to expand safely.
How to Check Propane Tank Level: 3 Reliable Methods
Let's be honest: the "fuel gauge" on most grills is practically useless. It’s just a pressure gauge, which can read "full" on a hot day even when the tank is nearly empty. Don't trust it.
If you really want to know how much propane you have left, there are only three methods that work.
| Method | Accuracy | Speed | Cost |
| Hot Water Trick | Good | Fast (2 mins) | Free |
| Weighing Method | Excellent | Slow (5 mins) | Free |
| Aftermarket Gauge | Varies | Instant | $ |
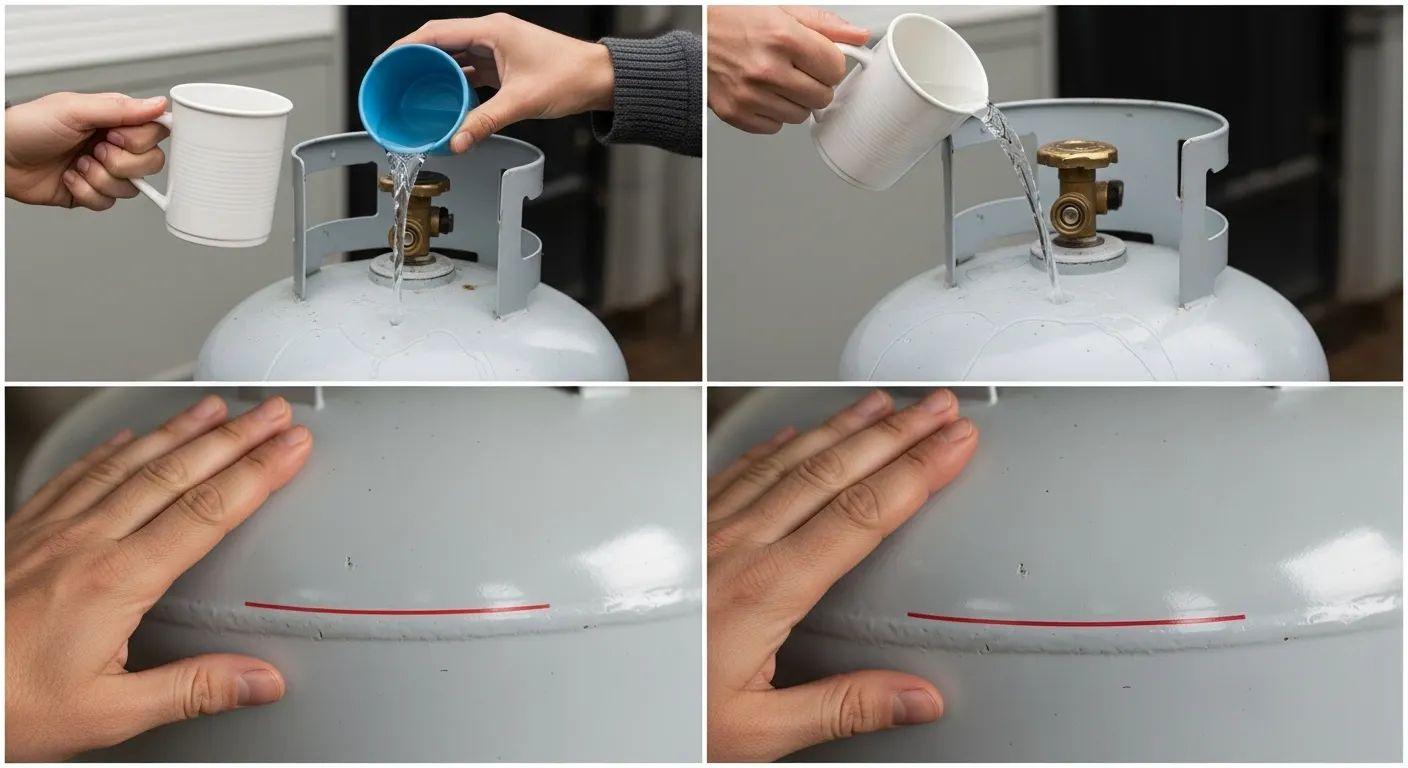
Method 1 (Visual): The Hot Water Trick
This is the fastest, easiest way to get a good estimate. It works because the liquid propane inside the tank absorbs heat, making the metal wall cold to the touch.
- Get Hot Water: Fill a small bucket or a large cup with hot tap water. (Don't use boiling water; it's not necessary and you risk a burn.)
- Pour Slowly: Pour the hot water down one side of the tank.
- Feel for the Line: Immediately run your hand down the side of the tank where you poured the water. You'll feel the hot upper portion (where there's only gas vapor) and a distinctly cold section.
- That's Your Level: The top of that cold line is the top of your liquid propane.
It’s surprisingly accurate and a great "am I okay for one more cookout?" check.
Method 2 (Accurate): The Weighing Method
This is the most accurate method, period. It's simple math. You just need a basic bathroom scale.
- Know Your "TW": Go back to the stamp on your tank's collar. Find the "TW" (Tare Weight). Let's say it's
TW 18.5. This is what your tank weighs empty. - Weigh the Tank: Put your propane tank on the scale. Let's say it weighs 22.5 lbs.
- Do the Math:
- (Total Weight) - (Tare Weight) = (Fuel Weight)
- 22.5 lbs - 18.5 lbs = 4 lbs of propane
A standard grill tank holds about 20 lbs of propane, so 4 lbs means you're running low (about 20% full).
Method 3 (Convenient): Aftermarket Gauges & Monitors
If you don't want to mess with water or scales, you can buy a gauge that does the work for you. They come in three main types:
- Pressure Gauges (Inline): These screw in between the tank and your hose. They're better than nothing but can still be fooled by temperature.
- Temperature Strips (Stickers): These are like the hot water trick but on a reusable sticker. You stick it to the tank and pour hot water over it, and the strip changes color to show the level.
- Ultrasonic (Smart) Monitors: These are the new high-tech option. You magnetically attach a small sensor to the bottom of your tank, and it uses ultrasound to actually measure the liquid level, sending the result to an app on your phone.
How to Test for Leaks: A Step-by-Step Visual Guide
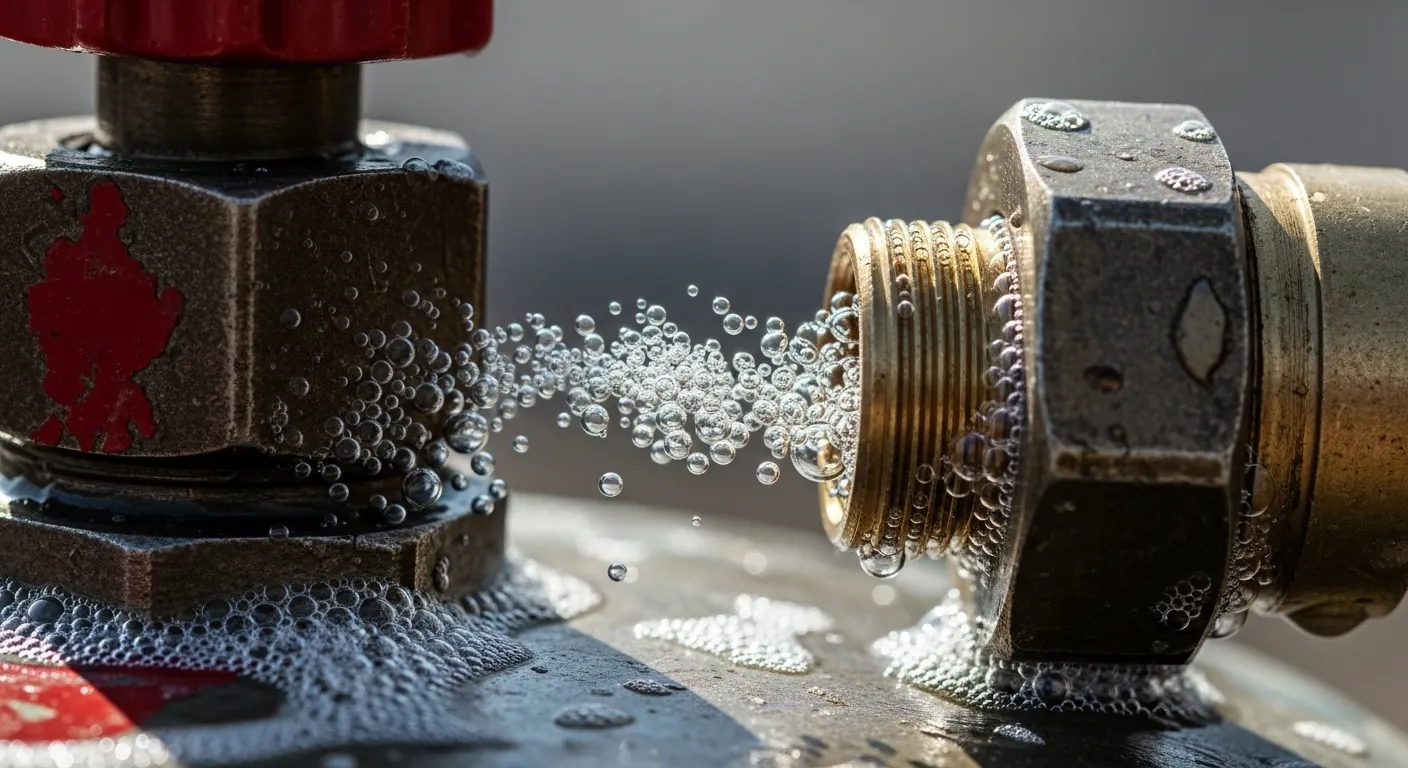
This is another non-negotiable. The good news? It’s incredibly simple and takes about 60 seconds.
You need to do this every time you reconnect a tank—whether you're swapping an empty one, getting a refill, or just hooking it up for the first time this season. Most leaks happen at the connection points, and this test is the only way to find them.
Step 1: Make Your Leak Solution
You don't need to buy the expensive stuff from the hardware store. Just mix about 1 part liquid dish soap with 3 parts water in a small bowl or spray bottle. You just want it sudsy.
Step 2: Connect and Pressurize the System
Connect your propane tank hose to the tank. Make sure all the knobs on your grill (or other appliance) are in the OFF position. Then, slowly open the valve on the propane tank (turn counter-clockwise). This pressurizes the hose and regulator with gas.
Step 3: Apply the Solution
Using a small brush, a sponge, or your spray bottle, generously apply the soapy water to all the connection points.
You must cover:
- The main valve connection where the hose screws into the tank.
- The regulator (that round, UFO-shaped thing in the middle of the hose).
- The entire length of the hose (check for tiny cracks).
- The connection where the hose attaches to the grill itself.
Step 4: Look for Bubbles
Now, watch closely. You're not looking for the bubbles you just made by dabbing the solution on.
You are looking for a stream of tiny, growing bubbles, or a cluster that foams up and gets bigger. This is a clear sign that gas is escaping and blowing bubbles in your soap film.
What to do if you see bubbles:
- Do not panic.
- Immediately turn off the valve on the tank (turn clockwise to close).
- Gently tighten the connection that was bubbling (it's often just a loose fitting).
- Turn the gas back on and re-test the same spot.
- If the bubbles still appear, STOP. Turn the gas off, disconnect the tank, and do not use it. You likely need a new hose/regulator assembly or a new O-ring in the valve.
If you see no new, growing bubbles after about 30 seconds, you have a secure, leak-free connection. You're safe to grill.
Propane Tank Maintenance: How to Handle Rust, Paint & Cleaning
Let's talk about that rusty, grimy tank sitting by your grill. Not all rust is a death sentence, but you can't ignore it either.
First, let's be clear: there are two kinds of rust.
- Surface Rust: This is the ugly, brownish-orange film that makes a tank look old. It's usually just cosmetic and can be managed.
- Deep, Pitting Rust: This is the real danger. This is when the rust has eaten into the metal, creating pockmarks, flakes, or deep pits. If you see this, especially on the bottom of the tank, stop using it immediately. The tank's integrity is compromised. Exchange it or take it to be disposed of.
For general cleaning, just use the same soap and water solution from your leak test. Wipe down the tank and valve area to keep it free of dirt, grime, and spider webs (which can cause blockages).
How to Fix Surface Rust (and Yes, You Can Paint Your Tank)
If you just have ugly surface rust, you can fix it.
- Disconnect the tank and take it to a well-ventilated area away from any flames.
- Use a wire brush or fine-grit sandpaper to gently remove the loose rust and flaking paint.
- Wipe the area clean with a damp cloth and let it dry completely.
So, can you paint it? Yes, but you have to do it right.
You can't just use any old spray paint. You need a high-quality, exterior-grade, rust-inhibiting paint. It must be applied in thin coats.
CRITICAL: What NOT to Paint
- NEVER paint the valve, fittings, or the regulator.
- NEVER paint over the stamped information collar (the part with the dates and TW). This information must be legible.
- NEVER paint the plastic OPD valve handwheel.
Pro Tip:
Ever wonder why propane tanks are always white or light gray? It's not for looks. Propane tanks are light-colored to reflect heat. A dark-colored tank (like one painted black) will absorb too much heat from the sun, which can raise the internal pressure and cause the safety relief valve to activate. Stick to light colors.
Safe Propane Tank Storage & Transportation
This part is simple, but it’s one of the most common mistakes people make. Let's get it right.
How to Store Your Propane Tank
The rule is simple: NEVER store a propane tank indoors.
That means no garages, no sheds, no basements, and especially not in your house. Why? Propane gas is heavier than air. If a leak develops, the gas won't just float out a window; it will sink and pool on the floor, waiting for an ignition source. A pilot light from a water heater or a furnace is all it takes.
Here are the non-negotiables for storage:
- DO: Store tanks outdoors in a well-ventilated, shaded area.
- DO: Keep the tank upright on a flat, stable surface (like a concrete paver, not bare dirt).
- DO: Keep it at least 10 feet away from any building, air intake, or ignition source.
- DON'T: Ever store it indoors or in an enclosed space (garage, shed, etc.).
- DON'T: Store a spare tank under or near your grill.
How to Transport Your Tank
When you go for a refill or exchange, you have to put it in your car. Do it safely.
- Keep it UPRIGHT. A tank on its side can leak liquid propane. Use a milk crate, a bungee cord, or a dedicated tank holder to ensure it can't tip over.
- Keep it VENTILATED. Crack a window in your car to allow for air circulation.
- Go STRAIGHT HOME. Don't leave a propane tank sitting in a hot, enclosed car trunk while you run errands. The heat can cause a dangerous pressure build-up. Get it home and get it outside.
The End of the Line: Expiration, Recertification & Disposal
Okay, so your tank is old, rusty, or you've checked the date on the collar and it's officially expired. What now?
You can't just throw it in your regular trash. (Seriously, don't do that. It’s dangerous and illegal in most places.)
You have three main options, and which one you choose usually depends on the type of tank you have.
Option 1: Tank Exchange (The Easy Way)
This is, by far, the simplest solution for a standard 20lb BBQ tank. Think of services like Blue Rhino or AmeriGas that you see in a cage outside a grocery or hardware store.
- How it works: You bring your old, expired, or empty tank and simply swap it for a full, certified one. They don't care about your expiration date because they handle all the recertification and disposal on their end.
- Pros: It's fast, convenient, and you don't have to think about dates.
- Cons: It can cost a few bucks more than refilling. You also don't "own" your tank; you're just part of their exchange pool.
Option 2: Recertification (For Tank Owners)
If you own your tank (you bought it new and just get it refilled), this is your path. Recertification is a professional inspection that, if passed, gives your tank a new stamp and another 5-12 years of life.
- Where to go: Your local propane supplier (the place you get refills, like a tractor supply, U-Haul, or a dedicated gas company) can often do it or tell you who can.
- When is it worth it? For a 20lb tank? Honestly, it’s a toss-up. It might cost $15-25 for the certification. If a brand-new tank is only $40-50, it's your call. For larger 100lb tanks? It is absolutely worth it.
Option 3: Safe Disposal (The Final Goodbye)
This is for tanks that are too damaged to be used or exchanged (like with deep, pitting rust or a broken valve).
- How to do it: You can't just put it on the curb. Your best bet is to call your local hazardous waste disposal facility or your landfill. Ask them for their specific procedure for "empty propane cylinders." They often have special "amnesty days" or designated drop-off points.
What To Do With Your Old Tank
- Is it a 20lb BBQ Tank?
- Yes: Easiest option: Tank Exchange (at any grocery/hardware store).
- Is it a larger tank (30-100lb) that you own?
- Yes: Call a local propane supplier for Recertification.
- Is the tank badly damaged (pitting rust) or a 1lb single-use can?
- Yes: Call your local hazardous waste facility for Safe Disposal.
Key Takeaways: Your Propane Confidence Checklist
We've covered a lot, but propane safety really boils down to a few simple, repeatable habits. If you're ever in doubt, just remember these five key points.
This is your cheat sheet for propane confidence.
- SMELL: Your nose is your first line of defense. If you smell that "rotten egg" odor, leave immediately and call for help from a safe distance.
- INSPECT: Before every use, perform the 5-Minute Safety Audit. Check your hoses, tank body, and valve, and clear the area.
- TEST: Always use the soap-bubble test every single time you reconnect a tank. Bubbles mean a leak.
- CHECK: Know your fuel level. Use the Hot Water Trick for a quick check or the Weighing Method for perfect accuracy.
- DATE: Know your tank's expiration date (stamped on the collar). If it's expired or badly damaged, don't use it—just exchange it.
Frequently Asked Questions (FAQ)
No, never. This is extremely dangerous. Propane tanks are designed to pull vapor (gas) from the top. When you lay a tank on its side, it pulls liquid propane, which can flood your regulator and hoses, causing massive flare-ups or even a fire.
The "regulator" (the round, UFO-shaped part) is tested for leaks just like the hoses. The soap-bubble test we covered is the best way to check its connections. If you suspect the regulator itself is faulty (e.g., you smell gas from the regulator body, or your flame is weak/yellow), don't try to fix it. Disconnect the tank and replace the entire hose/regulator assembly.
It depends. Light surface rust is just ugly and can be cleaned and repainted (as we covered above). However, if the tank has deep, pitting rust or large flakes, its integrity is compromised. That tank is no longer safe. Do not use it. Exchange it immediately.
This is a safety rule for refilling. Propane is a liquid, but it expands with heat. The "80/20 rule" means a tank is only ever filled to 80% capacity, leaving the other 20% of the space empty. This "head room" allows the liquid propane to expand safely on a hot day without triggering the pressure relief valve.
These single-use canisters are a pain. You can't just throw them in the trash, as they're a fire hazard for sanitation workers. You must ensure they are completely empty first. Then, call your local hazardous waste facility to see if they accept them. Some camping stores or communities also offer recycling drop-off days.
Yes, in most cases. A standard 20lb propane tank is interchangeable. Both your grill and your patio heater have their own regulator and hose assembly designed for that 20lb tank connection. Just make sure the connections are secure and you do a leak test.
They're the tank's ID. The two you need to know are the "TW" (Tare Weight), which is what the tank weighs empty, and the date stamp (e.g., "05-25"), which is its expiration date.
Confidence, Not Guesswork
Propane tank safety isn't about being a technical expert or memorizing regulations. It's about having a simple, repeatable routine.
You now have that routine.
You know how to read your tank's codes, perform a 5-minute safety audit, visually test for leaks, and check your fuel level using three different methods. You've replaced the guesswork with a clear, confident plan that keeps you safe.
To make that routine automatic, we created a simple, printable checklist of the most critical steps.
Your Next Step
Download our free, printable "5-Minute Propane Safety Checklist." Keep it with your grill, in your RV, or with your patio heater, and you'll never have to second-guess yourself again.
- Tired of checking the level at all? See our review of the [Complete Guide to Smart Propane & LP Gas Tank Monitoring — 2025].