The Essential Guide to Water Tank Sensor Installation
A successful installation is the foundation for accurate liquid level monitoring in your tanks.
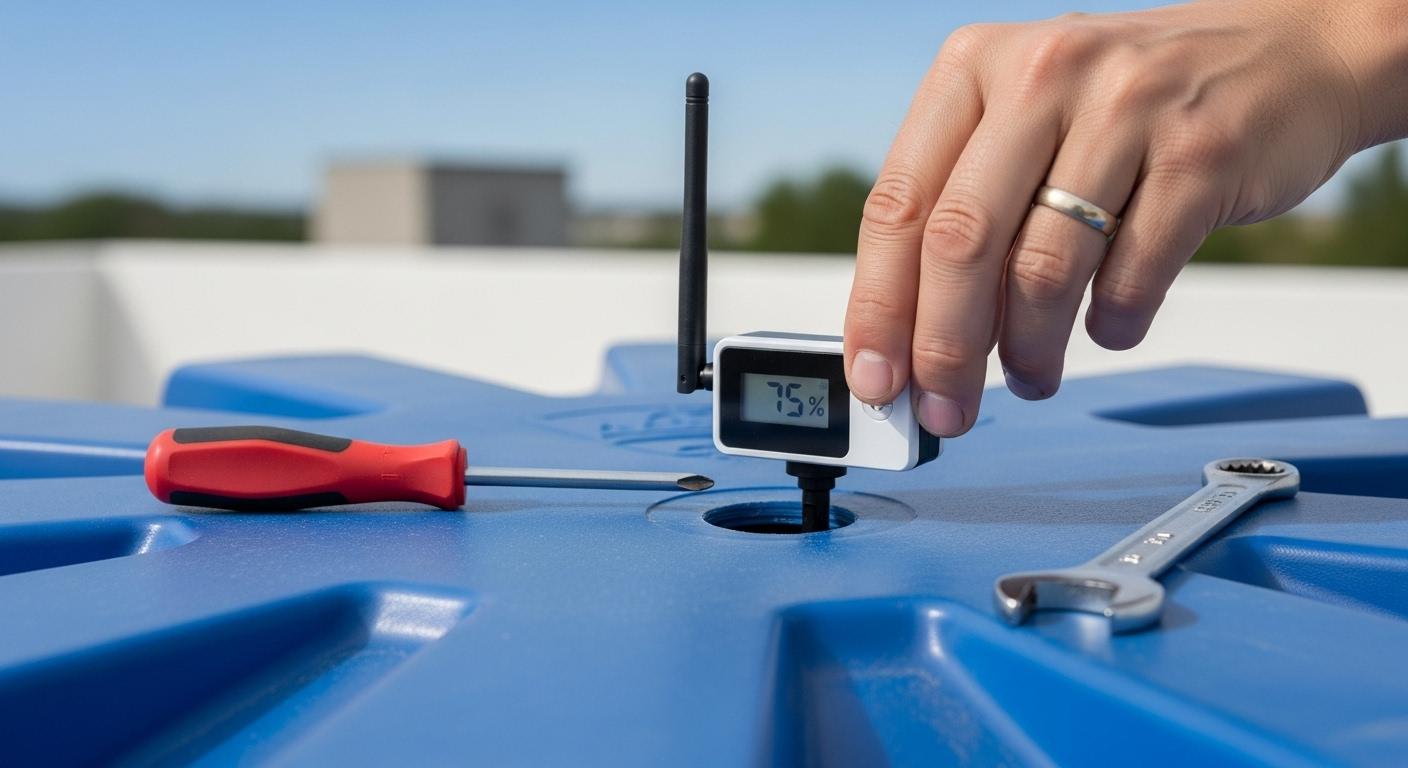
You begin by selecting a stable spot on top of your tanks. Next, you prepare the surface and mount your water level sensor for water tank. Finally, you connect the wiring to enable real-time monitoring. These water detection sensors are vital for water management systems, allowing constant monitoring.
Pre-Installation Checklist: Tools and Safety
Proper preparation is key to a smooth and safe installation. Before you begin working on your tanks, you should gather your tools and review critical safety measures. This simple step prevents delays and protects you from potential hazards.
Essential Tools You'll Need
Having the right tools on hand makes the job much easier. Your specific sensor model may have unique requirements, so always check the manufacturer's manual first. Here is a general list of tools you will likely need:
- Power drill with appropriate drill bits
- Adjustable wrench or socket set
- Screwdriver set (Phillips and flat-head)
- Waterproof sealant or Teflon tape
- Measuring tape
- Permanent marker
- Cleaning cloths and a mild degreaser
Safety First: Key Precautions
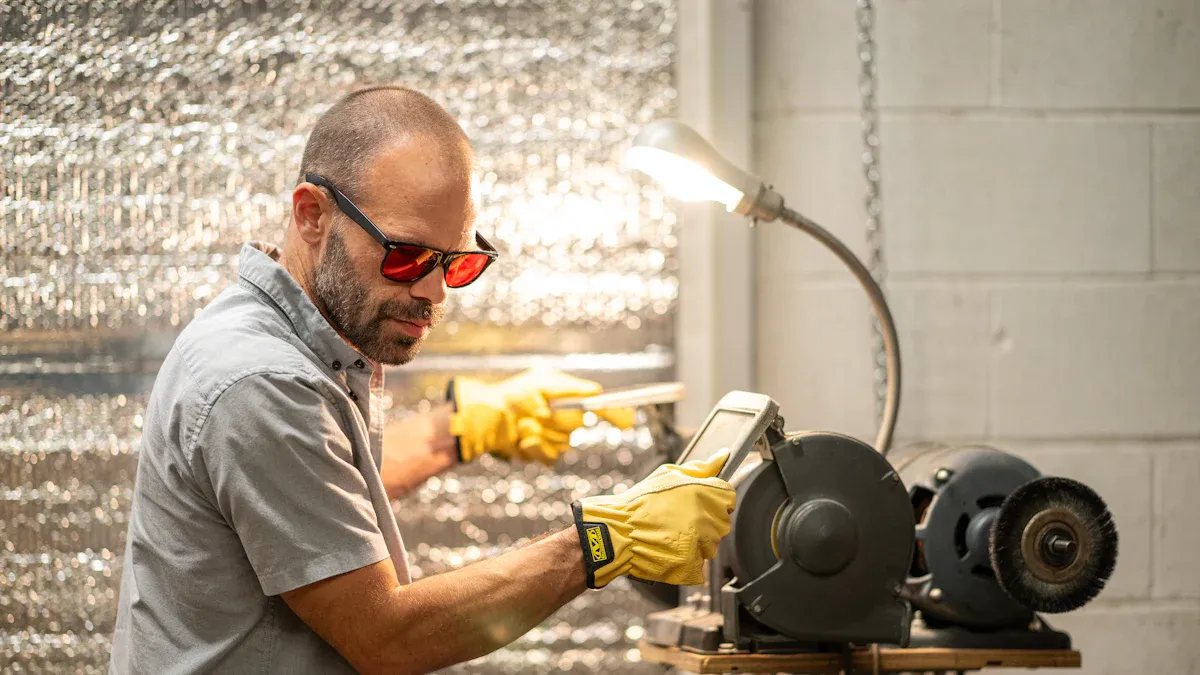
You must prioritize safety throughout the installation process. Working with tools and electrical components requires your full attention. Always wear the correct Personal Protective Equipment (PPE) for the task.
- Safety Glasses: Protect your eyes from flying debris.
- Gloves: Shield your hands from cuts and chemicals.
- Dust Mask: Use when drilling to avoid inhaling particles.
- Safety Footwear: Protect your feet from falling objects.
Electrical safety is also crucial, especially in wet environments. Your sensor and its connections must have an appropriate Ingress Protection (IP) rating. The second digit of an IP rating indicates its level of protection against liquids.
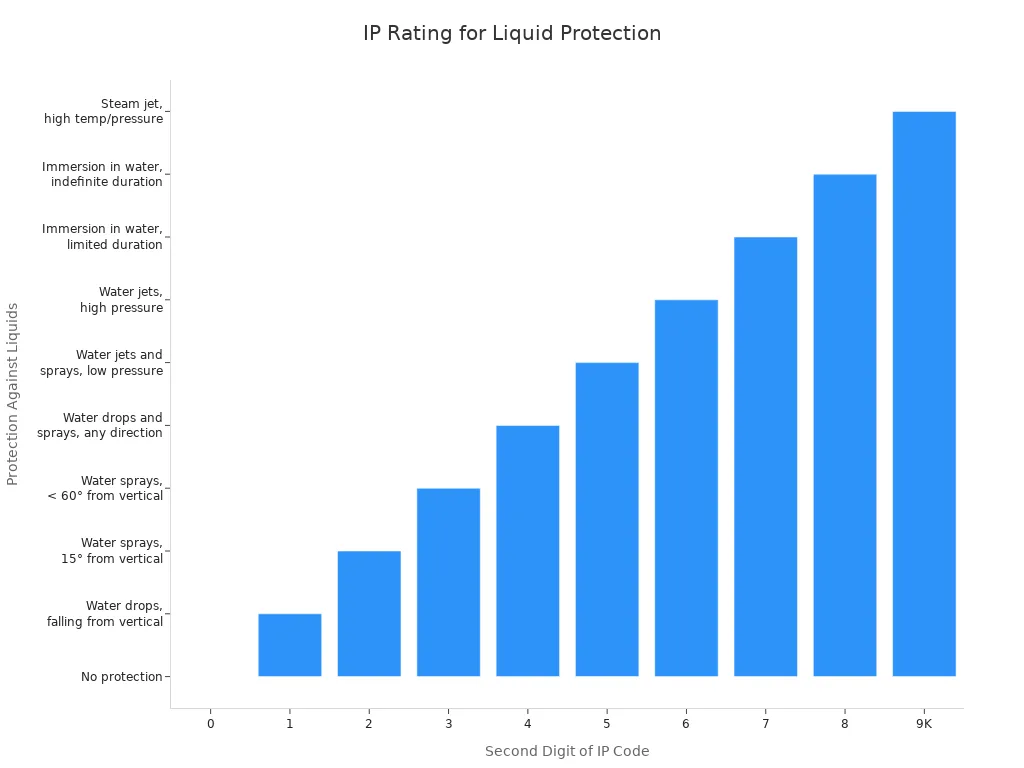
A higher number means greater protection. For example, a sensor rated IP67 can handle temporary immersion, while one rated IP65 can withstand low-pressure water jets.
| Second Digit (Liquids) | Protection Against |
|---|---|
| 4 | Water sprays from any direction |
| 5 | Low-pressure water jets |
| 6 | High-pressure water jets |
| 7 | Temporary immersion in water |
| 8 | Continuous immersion in water |
Tip: Always turn off the power supply at the circuit breaker before you start wiring your sensor. This simple action prevents electrical shock.
Understanding Your Water Level Sensor for Water Tank
You must choose the right sensor for your needs. Water level sensors fall into two main groups: contact and non-contact. Each type works differently and has a unique installation process. Understanding these differences helps you select the best water level sensor for water tank and install it correctly.
Contact vs. Non-Contact Sensors
Contact sensors must touch the liquid to measure its level. Common examples include submersible pressure sensors and float level sensors. These water detection sensors are often placed directly inside your tanks. They work well with clean liquids like water but may require more cleaning if the liquid is sticky or corrosive.
Non-contact sensors measure from a distance without touching the liquid. They are ideal for harsh chemicals or food-grade applications where cleanliness is vital. These advanced water detection sensors reduce maintenance since they do not get fouled by the liquid.
The table below shows some key differences.
| Feature | Contact Sensors | Non-Contact Sensors |
|---|---|---|
| Operation | Touches the liquid to measure. | Measures from above the liquid. |
| Best For | Clean liquids like water and fuel. | Corrosive, sticky, or high-purity liquids. |
| Maintenance | May need regular cleaning. | Requires very little cleaning. |
Key Differences in Installation
Your installation method depends entirely on your sensor type. Contact and non-contact water level sensors have very different mounting requirements.
You install contact sensors, like submersible probes or float level sensors, inside the tank.
- Submersible Sensors: You lower the probe directly into the liquid until it rests at the bottom.
- Float Level Sensors: You typically mount these through the side or top, with the float moving up and down with the water.
You install non-contact water detection sensors on the top of the tank, pointing down at the liquid's surface. This external mounting keeps the device safe from corrosive materials.
Installation Note: Non-contact sensors have a "dead band." This is a small area directly below the sensor where it cannot measure accurately. You must mount the sensor high enough so the maximum water level never enters this zone.
Step-by-Step Installation Guide
Now you are ready for the core part of the process: the physical installation. Following these steps carefully ensures your sensor operates correctly from day one. This guide will walk you through choosing a location, preparing the surface, and mounting the device.
Step 1: Choosing the Optimal Mounting Location
The right location is critical for accurate readings. You must select a spot that gives the sensor a clear, unobstructed view of the water's surface. Obstacles like pipes, ladders, or internal braces can cause false echoes and incorrect data.
The shape of your tank also plays a role. Cylindrical tanks often provide more predictable measurements due to their simple geometry. However, proper sensor positioning is the most important factor for any tank shape. You must account for all internal features to prevent measurement errors.
For non-contact water detection sensors, clearance is key. You need to provide enough space around the sensor to avoid interference.
- Give the sensor an open column of air to the water, ideally 3 to 4 feet in diameter.
- Keep the sensor at least 200mm (about 8 inches) away from the tank wall.
- A good rule of thumb is to position it 25-40% of the tank's diameter from the wall.
Important: Always check for internal obstructions before you drill. Look inside the tank to confirm your chosen spot is free from pipes, fill streams, or structural supports that could block the sensor's signal.
Step 2: Preparing the Tank Surface
A clean surface creates a strong, leak-proof seal. Any dirt, rust, or old paint can compromise the mount. You should prepare the area thoroughly before attaching the sensor.
First, use a cleaning cloth and a mild degreaser to wipe down the mounting spot. Remove all grime, dust, and oil. The surface must be completely clean and dry before you proceed.
Next, you will mark and drill the hole if your sensor requires it.
- Use your measuring tape and permanent marker to pinpoint the exact center of your mounting location.
- Select a drill bit that matches the size specified in your sensor's manual. A hole that is too large will be difficult to seal, while one that is too small will damage the sensor's threads.
- Drill the hole slowly and steadily. Wear your safety glasses and a dust mask to protect yourself from debris.
- Wipe away any metal or plastic shavings from the area after drilling.
Step 3: Mounting the Sensor (Top vs. Side Mounts)
Your mounting method will depend on your sensor type and the design of your tanks. The two main options are top-mounting and side-mounting. Your choice often comes down to physical access and the specific needs of your application. For example, you must use a top-mount sensor if your tank has no side access. A side-mount sensor is necessary if the tank extends from floor to ceiling.
| Mounting Type | Best For... | Common Sensor Types |
|---|---|---|
| Top Mount | Tanks without side access, open pits, or when measuring from above the liquid. | Ultrasonic, Radar, Vertical Float Switch |
| Side Mount | Tanks with side ports or when top access is blocked. | Horizontal Float Switch |
Once you have drilled the hole, you can mount your water level sensor for water tank. Gently thread the sensor into the opening. Do not overtighten it, as this can damage the threads or the tank itself.
Applying a waterproof sealant is the final and most crucial step for preventing leaks. The right sealant depends on your tank's material.
- SMP (Silane-Modified Polymer) Sealants: These are great all-rounders. They bond to wet surfaces and work well on steel, aluminum, and even concrete tanks.
- Loctite PL Marine Fast Cure: Choose this for a super-strong, waterproof bond. It can even be used below the waterline once cured, making it perfect for demanding environments.
- Loctite PL Roof and Flashing: This polyurethane sealant is ideal for exterior applications. It stays flexible to handle temperature changes and resists UV damage.
Apply a generous bead of sealant around the base of the sensor on the outside of the tank. For threaded mounts, you can also use Teflon tape on the threads for an extra layer of protection. These water detection sensors will now be securely in place.
Pro Tip: Always allow the sealant to cure completely according to the manufacturer's instructions before filling the tank. Rushing this step can lead to slow leaks.
Step 4: Wiring and Connecting to Your Monitoring System
You have now physically mounted your sensor. This final installation step connects the device to its power source and monitoring system. Proper wiring is essential for receiving accurate data and ensuring the long-term health of your equipment.
Safety First! ⚡ Before you touch any wires, you must turn off the power at the circuit breaker. This action is the most important step to prevent electrical shock. Always confirm the power is off with a voltage tester.
First, you need to identify your sensor's wiring requirements. Your manufacturer's manual is the best source for this information. Most sensors use a simple three-wire or four-wire setup.
- Power Wires: These provide the electricity the sensor needs to operate.
- Signal Wire: This wire sends the water level measurement to your display or controller.
- Ground Wire: This is a safety connection.
The table below shows common wire colors and their typical functions. However, you should always verify these with your specific sensor's documentation.
| Wire Color | Typical Function | Description |
|---|---|---|
| Red | Power (+) | Connects to the positive terminal of your power supply. |
| Black | Ground (-) | Connects to the negative terminal or common ground. |
| White/Green | Signal Output | Carries the measurement data (e.g., 4-20mA) to your system. |
Connecting to a PLC or Digital Display
Many modern sensors use a 4-20mA signal. This is a reliable way to send data over long distances. You can connect this type of sensor to a Programmable Logic Controller (PLC) or a digital panel for continuous monitoring. You will follow these general steps to configure the connection.
- Connect the Sensor to the PLC. You will first identify the correct input terminals on your PLC. Your PLC's documentation will show you where to connect the signal wire. Some systems may need a specific resistor for a 4-20mA input.
- Understand the Digital Value. The PLC takes the analog signal from your sensor and turns it into a digital number. You should check the PLC manual to see how it represents this value.
- Scale the Value Correctly. The raw digital number from the PLC is not a useful measurement. You must scale it into a human-readable format, like gallons, feet, or percentage full. Many PLCs have software functions to help you do this.
- Check Alarms. You can configure alarms for important events. For example, you can set up an alert for low water levels or a hardware alarm that detects a broken wire. This makes your monitoring more robust.
- Test Your Configuration. Before you rely on the system, you should test it. You can use a current loop tester to simulate a signal from the sensor. This helps you find and fix any issues with your setup early.
After you make all connections, secure the wiring neatly. You can use zip ties to bundle cables together. If the wiring is outdoors, you should run it through a waterproof conduit to protect it from weather and physical damage.
Installation Tips for Different Water Level Sensors
Your installation method will change based on the sensor you choose. Different types of water detection sensors have unique requirements for placement, wiring, and maintenance. Following the correct procedure for your specific model ensures you get reliable and accurate data from your system.
Installing Ultrasonic Sensors
You install ultrasonic water level sensors at the top of the tank. They are non-contact devices, meaning they measure the distance to the water's surface without touching it. Proper placement is the most important factor for a successful installation.
You must always account for the sensor's "dead band." This is a small zone directly beneath the sensor where it cannot take a reading. Your maximum water level must never enter this area.
- The dead band is usually a few inches.
- For example, some 14-foot range sensors have a dead band of 0-4 inches.
- You must mount the sensor high enough to keep the water level out of this zone.
Environmental factors can also affect performance. Condensation on the sensor's face can dampen the sound pulse and cause incorrect readings. Foam on the water's surface is a major problem. It absorbs the sound waves from the sensor. This happens because foam is mostly gas, not liquid. The sensor may show a lost signal if the foam is thick enough.
Tip: Install your ultrasonic sensor on a mounting bracket or flange. This keeps it perfectly level and perpendicular to the water's surface, which is essential for a strong signal return.
Installing Float Switch Sensors
Float level sensors are contact sensors that you place directly inside the liquid. They are a simple and reliable way to detect high or low water levels. The installation involves setting the trigger points by adjusting the float's position.
You must first understand if your float switch is Normally Open (NO) or Normally Closed (NC). This determines how it controls your pump or alarm.
| Feature | Normally Open (NO) | Normally Closed (NC) |
|---|---|---|
| Circuit State (Float Down) | Open (circuit is off) | Closed (circuit is on) |
| Action on Rising Water | Closes the circuit (turns on) | Opens the circuit (turns off) |
| Typical Application | Emptying a tank (pump-down) | Filling a tank (pump-up) |
For example, you use an NO switch to turn on a sump pump when water gets too high. You use an NC switch to turn on a pump to fill a tank when the water level gets too low. Choosing the correct type of float level sensors is critical for your application.
Properly positioning your float level sensors is key. You can follow these steps:
- Set the Tether Length. The length of the cable between the float and the mounting point determines the water level range.
- Attach a Counterweight. You slide a weight onto the cable to set the pivot point. This stabilizes the float and ensures it triggers at the correct level. Some float level sensors have a built-in counterweight.
- Position the Switch. You must place the float away from tank inlets or other sources of turbulence. This prevents the float from bobbing and causing the pump to switch on and off rapidly.
- Secure the Cable. You fix the cable at a point above the highest water level. This allows the float to move freely without getting tangled.
Note: Always ensure the materials of your float level sensors are compatible with the liquid in your tanks. For clean water, a standard switch works well. For wastewater, you may need a model designed to resist fouling.
Installing Submersible Pressure Sensors
Submersible water level sensors are one of the easiest types to install. You simply lower the sensor into the tank until it rests on the bottom. The sensor measures the pressure of the water above it to calculate the depth. While the physical placement is simple, protecting the cable is the most important part of the installation.
The sensor's cable does more than just transmit power and data. It also contains a vent tube. This tube must remain open to the air and dry.
- The vent tube allows the sensor to compensate for changes in atmospheric pressure.
- This ensures the sensor only measures the pressure from the water (hydrostatic pressure).
- A blocked or wet vent tube will cause inaccurate readings.
You must protect the cable to ensure long-term reliability.
- You should run the cable through a conduit if possible.
- Terminate the cable in a waterproof junction box with a high IP rating (like IP65 or higher).
- You can fit a special filter at the end of the vent tube. This filter lets air in but keeps moisture out.
- Some advanced water detection sensors use durable polyurethane cables and have built-in lightning protection for extra safety.
By protecting the cable and vent tube, you ensure your submersible pressure sensor provides accurate water level data for years.
Installing Radar Water Detection Sensors
You install radar water detection sensors for top-tier performance, especially in difficult environments. These devices use electromagnetic microwaves to measure the water level. This technology makes them extremely reliable and accurate.
Radar sensors offer significant advantages over other non-contact water level sensors. They are often the best choice for outdoor or industrial applications.
- Radar uses microwaves that do not need air to travel. This allows them to work in a vacuum or where different gases are present.
- They perform reliably under extreme conditions like high pressure and temperature.
- Changes in air temperature, turbulence, or vapor layers do not affect radar readings.
- These water detection sensors are highly robust and work well even with condensation or residue inside the tank.
A key factor for a successful radar installation is understanding the sensor's beam angle. The beam angle is the width of the microwave signal the sensor sends out. A narrow beam is focused, while a wide beam covers a larger area.
- The sensor's frequency affects the beam angle. Higher frequencies create a narrower beam.
- Antenna design also plays a role. Parabolic antennas produce a more focused, narrow beam.
- A sensor with a longer measurement range typically has a wider beam angle.
For level monitoring in tall, narrow tanks, you should choose a radar sensor with a small beam angle. This narrow focus prevents the signal from bouncing off the tank walls or internal structures like ladders. It ensures the sensor receives the strongest signal from the water's surface. This design allows for very precise measurements in tight spaces. These advanced water detection sensors can even filter out unwanted reflections for a clean reading.
Installation Tip: Always mount your radar sensor perpendicular to the liquid's surface. A slight angle can deflect the signal and cause a loss of echo. Use a flange mount to ensure the sensor is perfectly level.
Post-Installation: Calibration and Testing
An excellent installation requires proper calibration and thorough testing. You ensure your sensor provides reliable data by fine-tuning its settings and verifying its connection. This final phase confirms that your entire system works as expected.
How to Calibrate Your Sensor for Accurate Readings
Calibration syncs your sensor with your tank's specific dimensions. This process guarantees the highest level of accuracy for your water level monitoring. You can use a few different methods to set the empty and full points for your water level sensors.
- Hanging Weight Calibration: You can use this method by hanging a standard weight from your float sensor. This weight mimics a specific water level. You then adjust the sensor's settings to set the zero point (empty) and the full scale (full). This ensures linear and accurate measurement across the entire range.
- Water Calibration Method: This is a practical field method. You submerge the sensor in a container of clean tap water. You then adjust the transmitter's parameters so the readings match the water level in the container. This simple test confirms the sensor's accuracy.
For tanks with non-linear shapes, like horizontal cylinders, you need a more advanced calibration. Some configurators, like the one for Eurosens, allow you to input tank dimensions. For a horizontal cylinder, you would set the dimension 'E' to zero after calibrating the sensor's length. This adjustment ensures accuracy in irregularly shaped tanks. Companies like Victron Energy also plan to add options for non-linear tank calibration to their software.
Testing the System and Troubleshooting Common Issues
After calibration, you must test the system to confirm everything is working correctly. This involves checking the data transmission from the sensor to your monitoring platform. A successful test ensures your setup provides dependable monitoring.
You can verify the connection by following a process similar to this:
- Log into your monitoring system's software.
- Navigate to the section that lists your connected sensors.
- Find the group where you assigned your new sensor.
- Confirm that your newly installed sensor appears on the list and is reporting data.
If your water detection sensors do not appear, you may need to troubleshoot the connection. Check your wiring and power supply first. Ensure all connections are secure and the sensor is receiving power. Verifying the data flow confirms your system is ready for active monitoring and will deliver the accuracy you need.
Troubleshooting Common Installation Problems
Even with a careful installation, you might encounter issues. Most problems are simple to fix. This guide provides solutions for common challenges to ensure your system’s accuracy and reliability.
Sensor Not Powering On
If your sensor has no power, you should start with the basics. A logical check often reveals a simple oversight.
- Check the Power Source: Confirm the circuit breaker is on.
- Verify Wiring: Double-check that the power and ground wires are connected to the correct terminals.
- Confirm Voltage: Ensure your power supply matches the voltage required by the sensor. An incorrect voltage can prevent it from turning on.
Inaccurate or Fluctuating Readings
Inaccurate data can defeat the purpose of your monitoring system. Fluctuating readings often point to interference. You can improve measurement accuracy by identifying and removing these disruptions.
Common causes of signal interference include:
- Electrical Noise: Nearby motors, power lines, or other industrial equipment can create electromagnetic interference (EMI) that distorts the sensor's signal.
- Faulty Wiring: Loose or poorly crimped connections can cause the signal to drop intermittently, leading to erratic readings.
- Physical Obstructions: Foam, steam, or significant air bubbles on the liquid's surface can absorb or deflect a non-contact sensor's signal, causing incorrect measurements.
Dealing with Connection Errors
A weak or intermittent connection to your monitoring system can be frustrating. For wireless water detection sensors, this issue often relates to signal strength. You can follow these steps to find effective solutions.
- Check the distance between the sensor and the gateway. Walls and other large obstructions can block the signal.
- Monitor the signal strength in your software. A signal below -85dB is weak and can cause temporary data dropouts.
- Try reorienting the sensor or its antenna. Sometimes a small adjustment is all you need to improve the connection.
- As a test, move the sensor next to the gateway. If the connection becomes stable, the problem is likely range or an obstruction.
Pro Tip: Remember that water absorbs wireless signals. Even your own body standing between the sensor and gateway can temporarily weaken the connection during your installation or testing.
You now see that proper installation is the key to reliable water level monitoring. Your careful work ensures the best accuracy. You followed this guide to set up your water detection sensors for long-term monitoring and accuracy in your tanks. Your water level sensor for water tank is now ready. It will provide precise data for your real-time monitoring, giving you confidence in your water management and monitoring.
FAQ
Can I install a sensor on any type of tank?
Yes, you can install sensors on most tanks. You must choose a sensor and sealant compatible with your tank's material, whether it is plastic, metal, or concrete. Always check the manufacturer's specifications to ensure a proper and secure fit for your water detection sensors.
How often should I clean my water level sensor?
Your cleaning schedule depends on the sensor type and water quality.
- Non-contact sensors rarely need cleaning.
- Contact sensors in clean water may need a check-up yearly.
- For wastewater, you should inspect contact sensors more frequently to prevent buildup.
What is the best way to monitor multiple tanks? 🛰️
You can use a centralized monitoring system to track multiple tanks. Many systems allow you to connect several water detection sensors to a single dashboard. This gives you a complete overview of all your water levels from one convenient location.
How long will my water tank sensor last?
A sensor's lifespan varies by model and environment. A quality sensor, installed correctly, can last for many years. You protect your investment by following the installation guide and performing regular checks. Proper care ensures long-term reliability for your water level sensor for water tank.