How Wireless LP Tank Monitors Work: DIY vs. Pro Service Explained
Tired of trekking through snow just to guess how much propane is left in your tank? As home energy specialists, we know the anxiety of a potential run-out, especially during a cold snap. It's an awful feeling.
A wireless tank monitor solves this problem by giving you real-time fuel levels right on your phone.1 But how does it actually work?
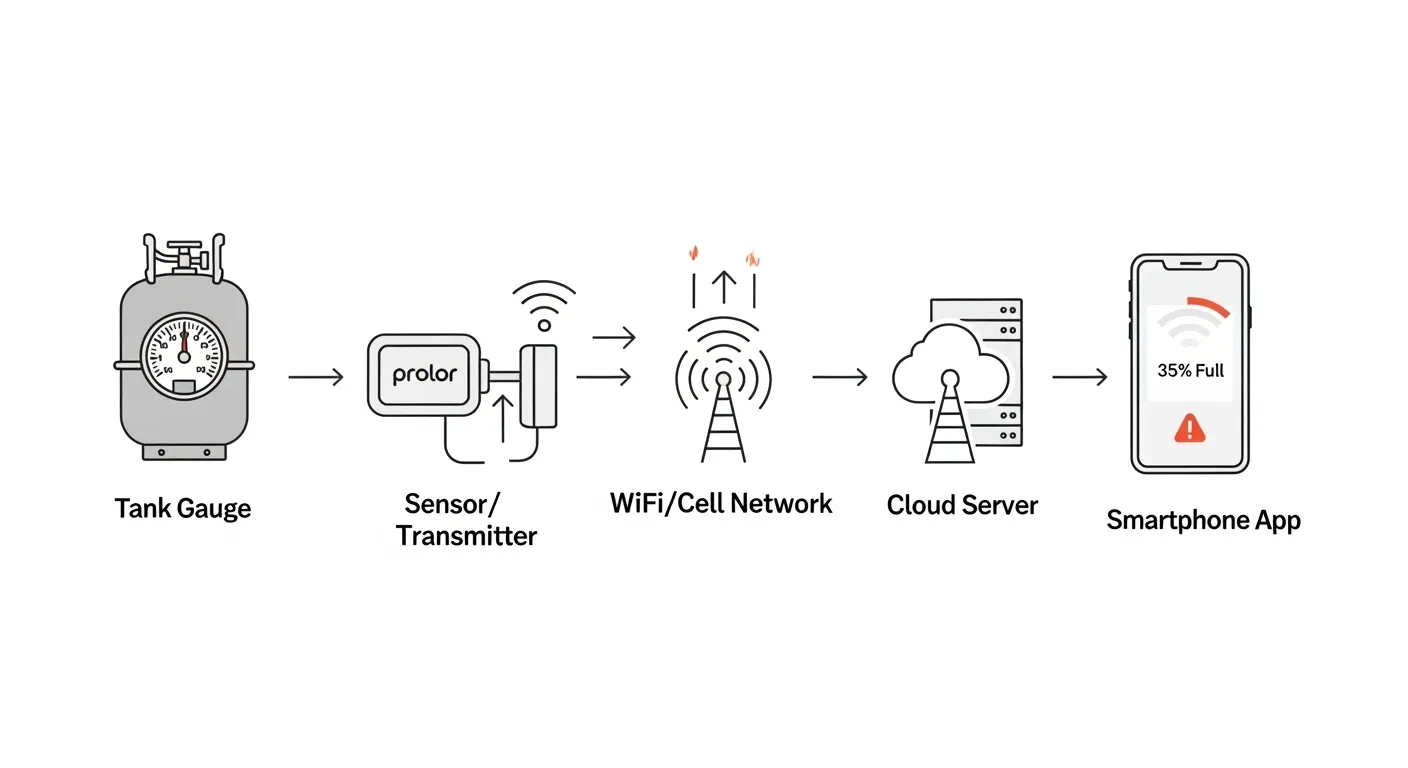
A wireless LP tank monitor works in 4 simple steps:
- Sensor Reading: A sensor attaches to your tank's "R3D-ready" dial and magnetically reads the float's position.
- Data Transmission: A small transmitter sends this level percentage (e.g., "35%") to the internet via your home WiFi or a cellular network.
- Cloud Processing: A secure server receives the data, logs it, and tracks your usage history.
- User Alerts: When the level drops to a preset threshold (e.g., 30%), you get an alert on your smartphone app.2
In this guide, we'll not only explain this process but also answer the two most important questions you probably have:
- How do I check if my tank is compatible? (The "R3D" check)
- What's the best way to get one: The DIY Path (buying your own) vs. The Full-Service Path (getting one from your supplier)?
Let's get started.
The 4-Step Process: How a Monitor Tracks Your Fuel
On the surface, it seems like magic, but the technology is surprisingly straightforward. It's a simple, reliable system designed to do one job well.
Let's break down exactly what happens from the tank to your phone.
Step 1: The Sensor Reads Your Gauge (The "Hall Effect")
This isn't a camera reading your gauge. It's much cleverer.
The monitor attaches to a special "R3D-ready" dial on your tank (more on that in a minute). Inside that R3D dial, the needle is connected to a magnet. As the propane level drops, the needle and its magnet move.
The monitor's sensor uses what's called a Hall Effect sensor. This is the expert part of the equation: a Hall Effect sensor can detect magnetism. This means it can read the exact position of the magnet through the sealed gauge.
Why is this so important? Safety. There are no new holes, no wires going into the tank, and no risk of a leak. It's a 100% non-invasive reading.
Step 2: The Transmitter Phones Home (WiFi vs. Cellular)
Once the sensor has a reading (e.g., "42%"), a small transmitter, usually in the same unit, has to send it to the internet. It does this by sending a tiny data packet, which is why the batteries last for years.
It uses one of two methods:
- WiFi: It connects to your home's 2.4 GHz WiFi network.
- Cellular (4G/LTE): It uses a built-in cellular chip, just like your phone, to connect to a nearby tower.
We'll cover the major pros and cons of WiFi vs. Cellular in a dedicated section below.
Step 3: The Cloud Logs Your Data
The reading isn't sent directly to your phone. It goes to a secure cloud server run by the monitor's company (like Generac or your propane supplier).
This is where the "smart" features come from. The server logs your 42% reading and compares it to your 43% reading from yesterday. It learns your average usage, tracks how fast you're using fuel, and builds a history. This allows the app to show you graphs and even predict when you'll need a refill.
Step 4: The App Alerts You (and Your Supplier)
The server constantly checks your level against the alert thresholds you set.
If you set an alert for 30%, the moment the server logs a "30%" reading, it triggers an action. It instantly sends a push notification to your smartphone app. If you're on a full-service plan, it also sends an alert to your propane company's delivery dispatch, automatically scheduling your refill.
And that's it. A simple, reliable flow: Read -> Transmit -> Process -> Alert.
CRITICAL FIRST STEP: Is Your Propane Tank "Remote-Ready"?
This is the step most people miss. Before you buy anything or call your supplier, you must check if your tank is compatible.
After helping dozens of homeowners with this, I can tell you that 90% of modern tanks are ready, but it's a huge headache if you buy a monitor and find out yours isn't. You need to check for one thing: an R3D-Ready Gauge.
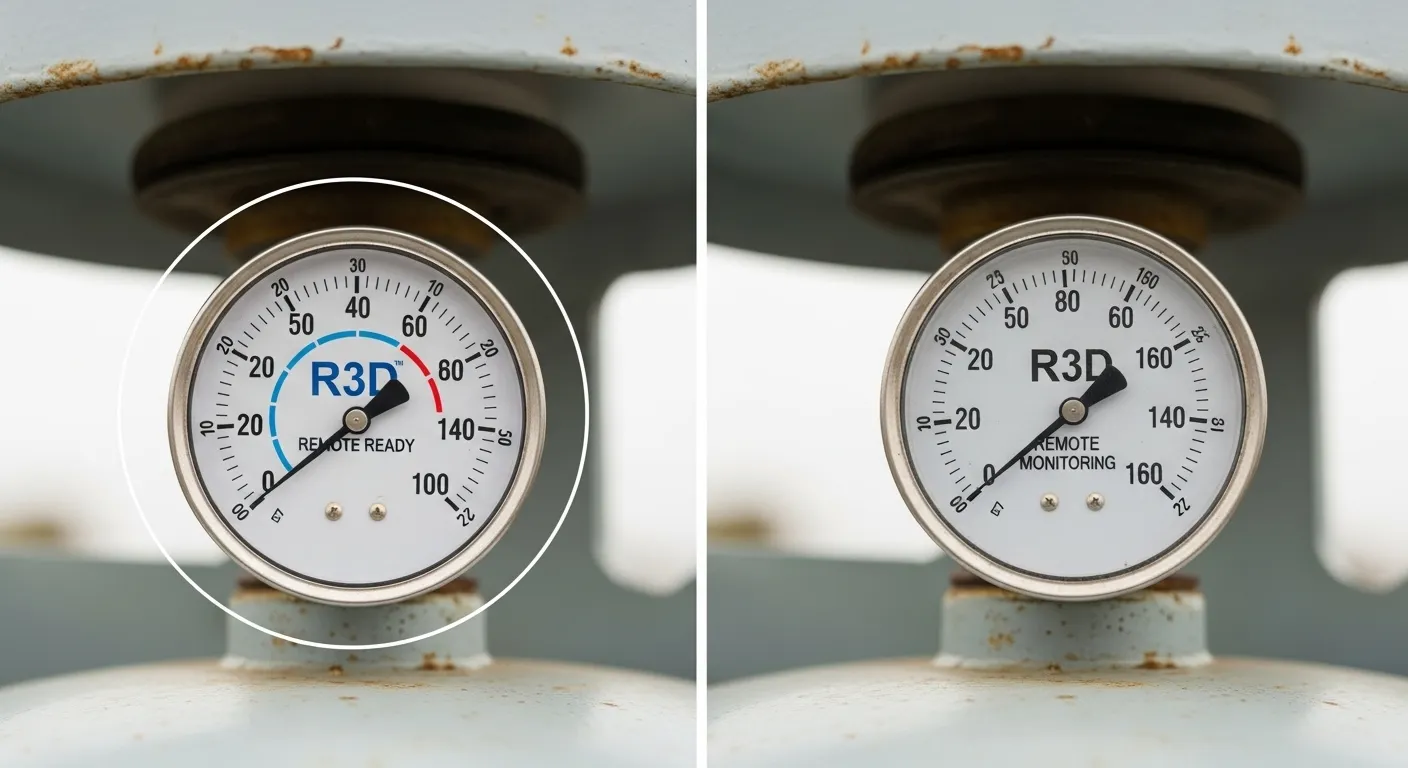
What is an R3D-Ready Gauge?
An R3D-ready gauge is a specific type of propane tank dial designed to be "read" by a remote monitor sensor.3 It has the letters "R3D" printed directly on its face and a special slot underneath where the sensor slides in.
These gauges have the necessary magnet inside for the Hall Effect sensor to read. If your gauge isn't R3D, a monitor has nothing to read, and it simply won't work.
How to Check Your Tank for R3D Compatibility (A 3-Step Guide)
You can do this yourself in about 30 seconds.
- Safely open your propane tank's dome. It's the lid on top of the tank that covers the gauge and valves.
- Look directly at the gauge's dial. You'll see the numbers from 10 to 90.
- Find the "R3D" logo. It's typically printed on the face of the dial, often near the "50%" mark. If you see "R3D," you are good to go. You can also confirm by feeling underneath the gauge for a small, open slot (it might have a black rubber dust cap in it).
What If My Tank Isn't R3D-Ready?
Don't panic. You still have a great option.
You cannot install the R3D dial yourself. This is a job for a propane professional.
Call your propane supplier and tell them, "I'd like to get a wireless tank monitor, but my gauge isn't R3D-ready. Can you please swap my dial?" They can replace the dial (a quick, safe job for them) and will almost certainly install their own monitoring service at the same time. This moves you directly to the "Full-Service Path."
The Two Paths to Get a Monitor: DIY vs. Full-Service
Okay, you've confirmed you have an R3D-ready tank. Now you have a choice. This is the main decision you need to make. Which path is right for you?
| Feature | Path 1: DIY (Buy Your Own) | Path 2: Full-Service (From Supplier) |
| How You Get It | Buy a device (e.g., Generac, Monnit) online or at a store. | Your propane company provides and installs their monitor. |
| Upfront Cost | $50 - $150 per device. | $0 or a small install fee (e.g., $50). |
| Monthly Cost | Yes. Usually $5 - $10/mo for cellular service or app access. | It's "hidden." Cost is bundled into your propane price or a monthly "lease." |
| Installation | You do it. (Very easy, 10-15 mins). | A technician does it for you. |
| Who Gets Alerts? | Only you. | You AND your propane supplier. |
| Best For | Control, flexibility, shopping for the cheapest propane. | Convenience, "set it and forget it" auto-delivery. |
H3: Path 1: The DIY Approach (Buying Your Own Monitor)
This path is for the homeowner who wants control.
- What it is: You buy a monitor from a brand like Generac (which owns Tank Utility) or Monnit. You install it yourself, download the app, and connect it.
- The Pros:
- Flexibility: You own the device. You are not tied to any single propane supplier.
- Price Shopping: This is the key. You can shop around for the best propane price each time you need a fill-up, as you are managing your own alerts.
- The Cons:
- Cost: You pay the upfront cost ($50-$150) and a subscription fee. Nearly all DIY monitors require a monthly or annual fee ($5-$10/mo) to pay for the cellular connection and cloud service.
- You're Responsible: You have to set it up, manage the app, and schedule your own deliveries when you get a low-level alert.
- Bottom Line: This path is best for hands-on homeowners who want to actively manage their propane and find the best per-gallon price.
Path 2: The Full-Service Approach (Provider-Supplied Monitor)
This path is for the homeowner who wants convenience.
- What it is: You call your propane supplier (like Ferrellgas, AmeriGas, etc.) and enroll in their "smart tank" or "auto-fill" monitoring program. They come out, install their monitor, and link it to your account.
- The Pros:
- "Set it and forget it": You do almost nothing. When your tank is low, the monitor alerts them, and they just show up and fill it.
- No Upfront Cost: Installation is typically "free" or rolled into a small setup fee.
- The Cons:
- Customer Lock-in: You are now tied to that supplier. You can't shop around for prices because their monitor is synced only with their delivery system.
- Hidden Costs: This is the big trust signal: The monitor is never truly "free." The cost of the device, the service, and the cellular fees are bundled into your per-gallon propane price or an "equipment lease fee." You are paying for it, just not as a separate line item.
- Bottom Line: This path is perfect for people who value convenience over cost-savings and never want to think about their propane level again.
Connectivity Explained: WiFi vs. Cellular Propane Monitors
This is the last key detail. When you're looking at DIY monitors, you'll see two types: WiFi and Cellular.
From my experience, this is an easy choice for 99% of people. Here’s the breakdown:
| Feature | WiFi Monitors | Cellular (4G/LTE) Monitors |
| How it Works | Connects to your home's 2.4 GHz WiFi network. | Uses a built-in cell chip to connect to a tower. |
| Range | POOR. Requires a very strong signal at the tank. | EXCELLENT. Works anywhere you have cell service. |
| Cost | Usually no monthly fee. | Always a subscription fee ($5-$10/mo). |
| Reliability | Fails if your WiFi goes down or the signal is weak. | Very reliable. Not dependent on your home internet. |
| Best For | Tanks very close (e.g., 20-50ft) to your house/router. | Almost everyone. Underground tanks, tanks far from the house. |
Why Cellular is Almost Always the Right Choice
Here is my single biggest piece of advice from testing these: Get the cellular model.
Your propane tank is almost always in a spot with bad WiFi. It's outside, it's a metal box, and it's often 100+ feet from your router. A WiFi monitor will constantly drop its connection, giving you a false sense of security. I've seen it fail time and time again.
The $5-a-month fee for a cellular model is absolutely worth the peace of mind. It just works, every time.
Frequently Asked Questions
They are very accurate. Most modern monitors are precise to within +/- 1% to 5% of the actual tank level. This is far more accurate than trying to guess the needle's position by eye, especially on a frosty morning.
Indirectly, yes. A monitor cannot "smell" gas or detect a pinhole leak. However, its software is smart enough to detect a sudden, rapid drop in the propane level that isn't from normal use. Many apps will send you a "Rapid Drop Alert," which could signify a major leak, giving you a critical early warning.
Yes, if it's a DIY model and you have an R3D-ready gauge. The installation takes about 10-15 minutes and requires no tools. You just slide the sensor into the slot and attach the unit to the tank (it's usually magnetic). A monitor from your supplier must be installed by their technician.
Most monitors use special long-life lithium batteries that last a very long time, typically 3 to 7 years. Because they only send one tiny data packet a day, they use very little power.
As long as the gauge is accessible under the ground-level dome, the monitor works exactly the same. The dome lid (which is usually plastic or fiberglass) won't block the cellular or WiFi signal.
Rarely. The "free" monitor is a marketing tool. The cost of the device and its monitoring service is almost always bundled into your per-gallon propane price or a small annual equipment lease fee. It's a convenience, not a free product. For a deeper dive into these programs, check out this smart propane monitoring guide.
Your Next Steps: From "How" to "Done"
As you can see, a wireless LP tank monitor is a simple, powerful tool. It's not magic, just smart tech—a Hall Effect sensor reading your R3D gauge, a transmitter using cellular or WiFi, and an app to alert you.
Here are your key takeaways:
- The technology works by magnetically reading your gauge's level without any holes.
- The #1 gap competitors don't cover is R3D-gauge compatibility.
- You have two main paths: DIY (for control and price shopping) or Full-Service (for total convenience).
- Cellular monitors are far more reliable than WiFi models for almost all homes.
So, what's your immediate next step?
Before you do any more research, go outside, lift the dome on your propane tank, and look for the "R3D" logo on the gauge.
That 30-second check will tell you everything you need to know. If you see it, you're ready to decide which path—DIY or Pro—is the right one for you.