
Raspberry Pi Optical Water Level Sensor Guide
An optical water level sensor raspberry pi project is simple only if you handle one critical detail first: Raspberry Pi GPIO pins use 3.3V logic, while many optical water level sensor modules are powered by 5V. That means the sensor can read water correctly, but its signal output may still be unsafe for the Pi unless you confirm it is 3.3V-compatible or pass it through a level shifter.
This guide explains how to wire an optical sensor to a Raspberry Pi, read the wet/dry signal in Python, and use that signal for a pump, buzzer, notification, or home-automation trigger.
The First Rule: Do Not Feed 5V Into Raspberry Pi GPIO
A Raspberry Pi can provide both 5V and 3.3V power pins, but its GPIO input pins are designed for 3.3V logic. If a sensor output sends a 5V HIGH signal directly into a GPIO pin, it can damage the Pi.
Many DIY optical infrared water level sensor boards are sold as 5V modules. Some have open-collector or transistor outputs that can be pulled up safely to 3.3V, while others output a full 5V logic signal. Do not assume. Check the module output type before wiring.
For a safe Raspberry Pi setup:
- Power the sensor according to its rated voltage.
- Share ground between the sensor, Raspberry Pi, and interface circuit.
- Use a logic level shifter, optocoupler module, transistor interface, or confirmed 3.3V-safe output before the signal reaches GPIO.
- Never drive a pump directly from GPIO; use a relay, MOSFET driver, or pump controller.
If you are comparing sensor options, a product page for a 5V IR sensor module is a useful starting point, but always confirm the signal-output behavior for Raspberry Pi use.
How an Optical Water Level Sensor Reads Wet and Dry States
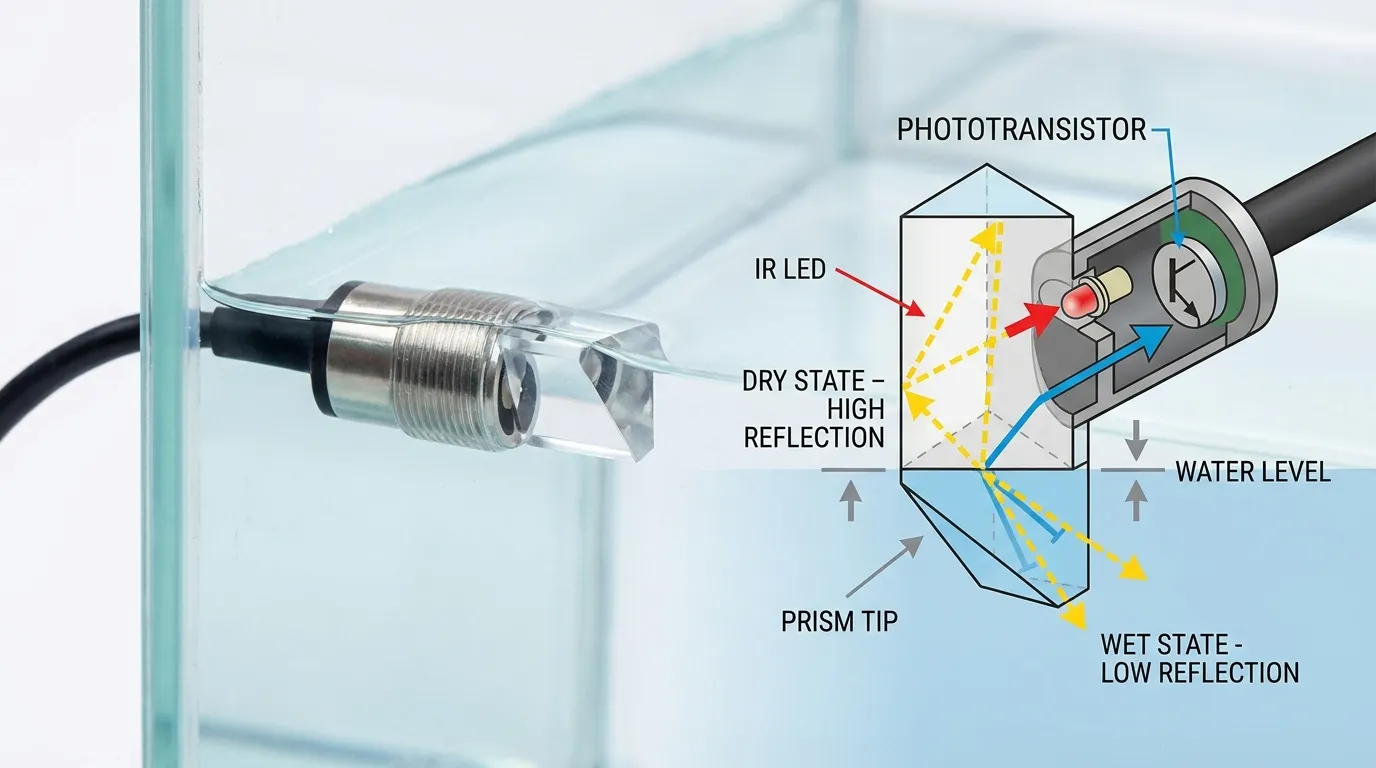
An optical water level sensor uses photoelectric sensing. Inside the sensor body, an infrared LED sends light toward a prism-shaped sensing tip, and a phototransistor or photodetector receives the reflected light.
When the prism tip is in air, light reflects internally and returns strongly to the receiver. When the tip is covered by liquid, the refractive condition changes, so less light returns. The sensor electronics convert that optical change into a usable output such as HIGH/LOW, NPN, PNP, or analog/industrial signal depending on the model.
This makes optical sensing useful for point-level detection, such as:
- Aquarium auto top-off level
- Plant reservoir low-level alarm
- Sump overflow warning
- Water tank empty detection
- Coffee machine or appliance reservoir sensing
- Small pump dry-run protection
- Portable AC drain bucket alert
Unlike float switches, optical sensors have no moving float arm. That helps in compact tanks or applications where mechanical sticking is a concern. However, the sensing tip must still be installed where liquid can reliably touch it.
GPIO Wiring Table for Raspberry Pi
The table below shows a safe general wiring concept for a 5V optical sensor module connected to a Raspberry Pi through level shifting. Pin numbers are examples; you can choose other GPIO pins in your Python script.
| Sensor / Module Point | Connects To | Raspberry Pi Example | Important Note |
|---|---|---|---|
| Sensor VCC | 5V or rated sensor supply | 5V pin, if the module requires 5V | Use only the voltage the sensor is designed for |
| Sensor GND | Common ground | Pi GND pin | Sensor, Pi, and driver circuit must share ground |
| Sensor OUT | High-voltage side of level shifter | Not directly to GPIO if output is 5V | Protects Pi from 5V logic |
| Level shifter low-voltage side | Raspberry Pi GPIO input | GPIO17, physical pin 11 | GPIO should see 3.3V maximum |
| Relay/MOSFET input | Raspberry Pi pump-control GPIO | GPIO27, physical pin 13 | GPIO controls a driver, not the pump directly |
| Pump power | External pump supply | Not from GPIO | Match pump voltage/current separately |
For a broader visual reference, see this wiring diagram, then adapt the signal side for Raspberry Pi 3.3V GPIO protection.
Step-by-Step Raspberry Pi Wiring Logic
Start with the sensor only. Do not connect the pump during the first test.
First, power the optical sensor according to its rated voltage. A 5V module can usually be powered from the Pi 5V pin for a small test, but larger systems should use a stable external supply. Connect the sensor ground to Raspberry Pi ground.
Second, route the sensor output through a safe interface. If the output is 5V push-pull, use a level shifter or optocoupler. If the output is open-collector NPN, you may be able to use a 3.3V pull-up on the Raspberry Pi side, but confirm the module circuit before doing this.
Third, connect the safe 3.3V signal to a GPIO input such as GPIO17. In Python, configure that pin as an input. Depending on the sensor output, you may need an internal pull-up or pull-down. If the logic appears reversed, do not panic; many optical modules report LOW when wet and HIGH when dry, while others do the opposite.
Fourth, test the wet and dry states by dipping only the prism tip into water. Watch the printed GPIO state. Confirm the sensor changes consistently before adding a pump or automation.
Minimal Python Loop: What It Should Do
You do not need a complex program for the first test. A minimal Python loop should do five things:
- Import a Raspberry Pi GPIO library.
- Choose BCM pin numbering.
- Set the sensor pin as an input.
- Read the pin repeatedly.
- Print “wet” or “dry” based on the GPIO state.
The loop can check the sensor every half second or every second. If the input is HIGH, print one state; if it is LOW, print the other. After testing the real sensor, label the states correctly in your script.
For a pump-control version, add a second GPIO pin as an output. When the water level is low, the script can turn on a relay or MOSFET input. When the sensor detects water at the target level, the script turns the pump off. Add a maximum runtime limit so the pump cannot run forever if the sensor is unplugged, dirty, or installed incorrectly.
A safe pump script should include:
- Wet/dry state confirmation
- Delay or debounce to avoid false switching
- Maximum pump-on time
- Error state if the sensor reading does not change
- Manual override or shutdown option
- Notification when water is low or pump timeout occurs
Pump and Notification Ideas
For a DIY reservoir, the Raspberry Pi can do more than read the sensor. It can trigger a buzzer, LED, relay board, MOSFET pump driver, email, Telegram message, MQTT topic, or Home Assistant automation.
Common logic examples:
- If tank is dry, send a phone notification.
- If reservoir is low, turn on a refill pump.
- If the top sensor becomes wet, stop the pump.
- If pump runs too long, shut down and send an alert.
- If overflow sensor becomes wet, disable the pump immediately.
For pump control, use a properly rated relay or MOSFET module. The Raspberry Pi GPIO pin should only provide a control signal. The pump current must come from a separate power supply sized for the pump.
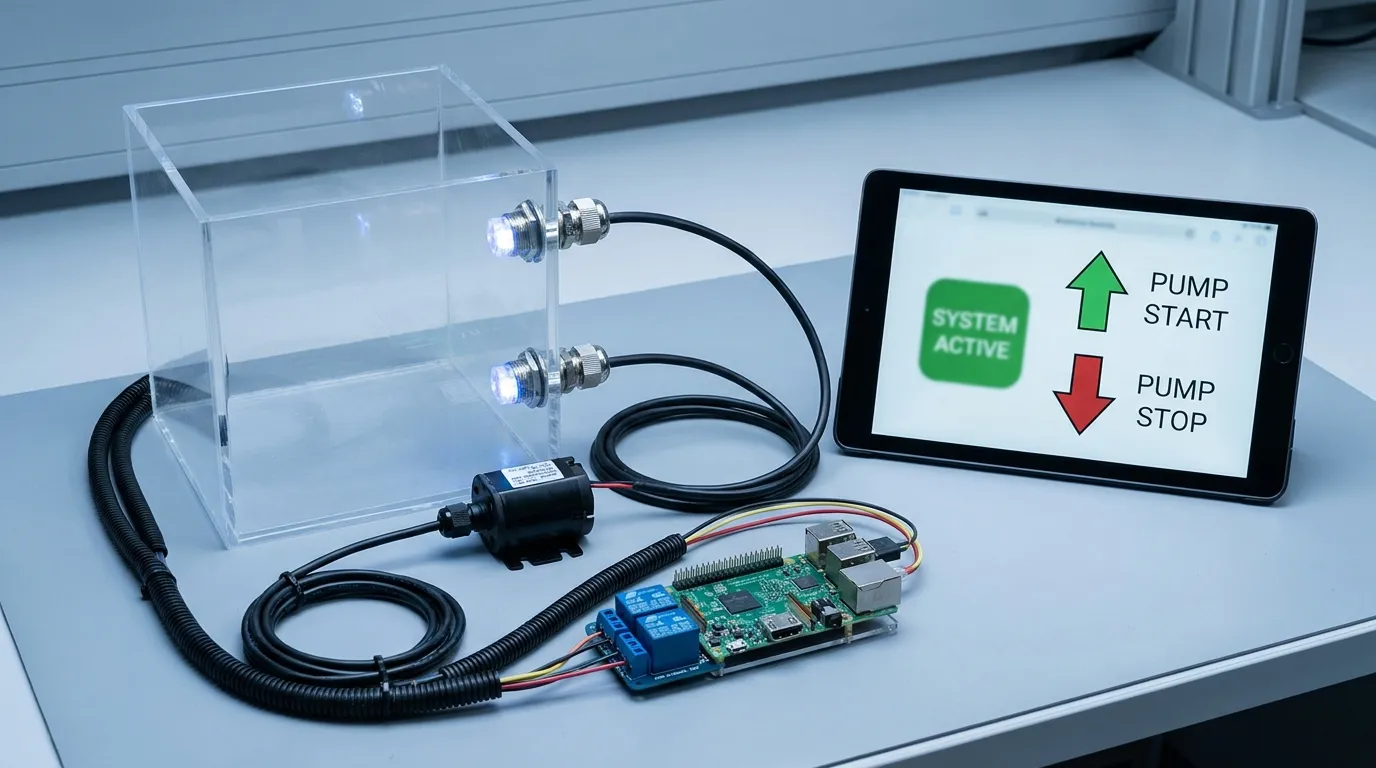
For higher reliability, many builders use two sensors: one low-level sensor for pump start and one high-level sensor for pump stop or overflow protection. This is safer than relying on only one point.
Home Automation Tie-Ins
A Raspberry Pi optical level sensor can fit into many home-automation systems. With MQTT, the Pi can publish a topic such as tank/status = wet or tank/status = dry. Home Assistant can then show it as a binary sensor and trigger automations.
For aquarium users, the same concept can support auto top-off systems. For plant growers, it can report reservoir low level. For appliance monitoring, it can detect a drain bucket or small tank reaching a warning point.
An Arduino version may be simpler for a single sensor and relay, while Raspberry Pi is stronger when you want networking, logging, dashboards, notifications, or integration with other smart devices.
Where relevant, HojellyTek can also support Tuya/Smart Life-oriented liquid level monitoring projects, especially where a buyer wants a more productized path instead of a loose breadboard prototype.
Sensor Body, Material, Output, and Mounting Choices
For a bench test, the module style matters most. For a real installation, the sensor body and mounting style matter just as much.
Typical wetted-material choices include PSU plastic, PTFE, 316 stainless steel, and glass. PSU is common for compact water-level applications. PTFE is useful when chemical resistance is required. 316 stainless steel is often selected for industrial fluid contact and mechanical strength. Glass can be useful for specific optical or chemical compatibility requirements.
Output type is another key buying point. A DIY Raspberry Pi input usually needs a digital wet/dry signal that can be safely converted to 3.3V. Industrial systems may require NPN, PNP, relay-style switching, or 4–20 mA output for PLC and control-panel use. For Raspberry Pi, NPN or open-collector outputs are often easier to interface safely if the pull-up is handled correctly.
Mounting should match the tank. Options may include threaded mounting, side-wall installation, vertical installation, flange mounting, or custom body dimensions. The sensing tip must sit at the actual decision level. If it is tilted, blocked by bubbles, coated by residue, or placed in a dead zone, readings may become unreliable.
For productized builds, a sealed optical level sensor is usually more dependable than a loose DIY board hanging near a tank.
Common Failure Modes and Fixes
| Problem | Likely Cause | What to Check |
|---|---|---|
| GPIO always reads HIGH | Pull-up logic, wrong output type, no state change | Test wet/dry states with a meter |
| GPIO always reads LOW | NPN output wiring, missing pull-up, wrong ground | Confirm common ground and pull-up |
| Pi becomes unstable | 5V signal into GPIO, pump noise, weak power | Use level shifting and separate pump power |
| Pump chatters on/off | Waves, splashing, no debounce | Add delay and state confirmation |
| False wet reading | Condensation, bubbles, residue on prism | Clean tip and adjust mounting |
| No pump response | GPIO driving pump directly or wrong relay input | Use rated relay/MOSFET driver |
| Sensor works on desk but not in tank | Poor mounting position or cable noise | Secure sensor and route cable away from pump wiring |
What to Check Before Ordering a Sensor
Before choosing an optical water level sensor for Raspberry Pi, confirm:
- Sensor supply voltage
- Output voltage and whether it is 3.3V-safe
- Output type: digital, NPN, PNP, or analog
- Wet/dry logic state
- Required mounting thread or bracket
- Wetted material compatibility with the liquid
- Cable length and connector style
- Whether the sensor will be exposed to steam, foam, oil film, or residue
- Whether the project needs one sensor or two for safer pump control
For OEM/ODM projects, HojellyTek can help match optical sensing design, output type, material, cable, and mounting to the final equipment instead of forcing a generic hobby module into a production product.
FAQ
Can I connect a 5V optical water level sensor directly to Raspberry Pi GPIO?
No. A Raspberry Pi GPIO pin should not receive a 5V signal. If the sensor output is 5V, use a level shifter, optocoupler, or confirmed open-collector circuit pulled up to 3.3V.
What is the safest wiring for an optical water level sensor raspberry pi project?
Power the sensor at its rated voltage, share ground, send the output through a 3.3V-safe interface, then connect it to a GPIO input. Do not connect a 5V signal directly to the Pi.
Which GPIO pin should I use?
Any available input-capable GPIO can work. GPIO17 is a common example for the sensor input, and GPIO27 is a common example for a relay or MOSFET control signal.
Why does my sensor read the opposite state?
Many optical sensors have inverted logic depending on their internal circuit. Test the dry and wetted states first, then label HIGH and LOW correctly in your Python script.
Can the Raspberry Pi power the pump?
No. The Pi should only control a relay or MOSFET driver. The pump needs a separate power supply rated for its voltage and current.
When should I use a productized sensor instead of a DIY module?
Use a productized sensor when the project needs sealed construction, repeatable mounting, stable cable connection, material compatibility, OEM integration, or long-term pump/overflow protection.
Request a Sensor Recommendation
A Raspberry Pi prototype is a good way to prove the logic, but production equipment needs safer wiring, better sealing, correct output type, and reliable mounting. HojellyTek is a Shenzhen manufacturer and exporter focused on photoelectric optical liquid level sensing, with in-house R&D, OEM/ODM support, and export experience for the US, EU, and India.
For a Raspberry Pi prototype, pump-control project, smart reservoir, or OEM liquid-level device, request a quote via WhatsApp or email and share your liquid type, sensor voltage, GPIO/interface requirement, mounting style, and target wet/dry switching logic.